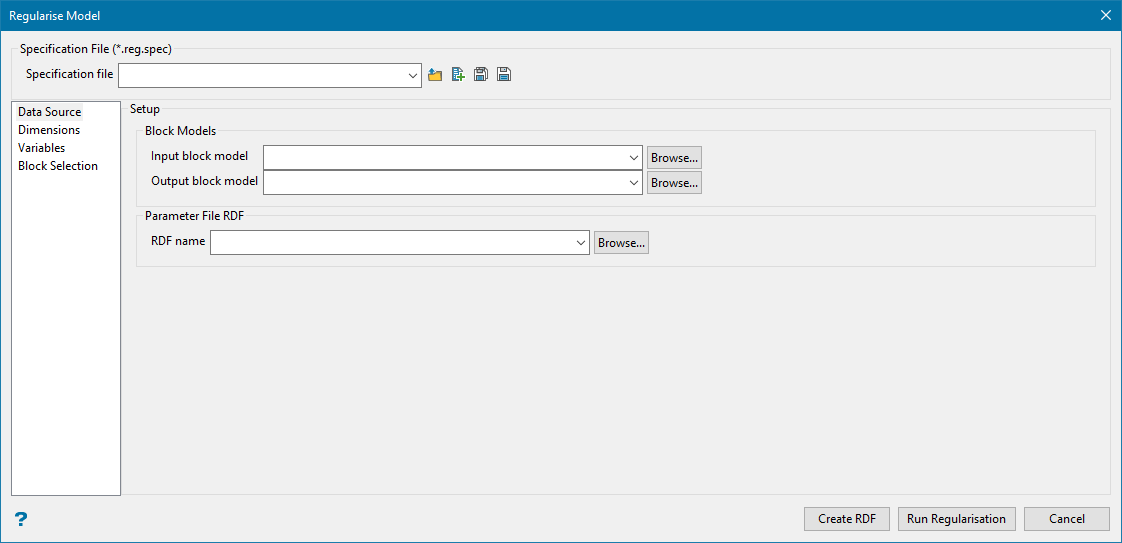
Regularise Model
Use this option to create or edit a block model definition file (.bdf) that can then be used to regularise a block model.
You can also create Block model definition files through other block model options, such as Block > Transfer > Addition Parameters, Block > Construction > New Definition, and Block > Manipulation > Extract Definition File.
If you use the Regularise Model option to edit these types of block model definition files (.bdf), a warning message displays informing you that the .bdf file is not a reblock definition file.
Creating a model
Create a regularised block model as follows:
-
On the Block menu, point to Transfer, then click Regularise.
-
Provide a Specification file name. Either:
-
If reblocking for the first time, enter a name for your specification file, then click the save
 (Save) button.
Or
-
If returning to a previous project, select the specification file from the drop-down list, or browse for it by clicking on the
 (Browse) button.
-
-
In the Data Source pane, complete the Input block model field. If you are reblocking for the first time, select the block model that you want to reblock. The drop-down list contains all block models found within the current working directory. Click Browse... to select a file from another location.
After selecting an input block model, the Output block model and RDF name (Reblock Definition File) fields will automatically be populated with suggested names. You may change these names if you wish, however, the extensions must not change.
If you are editing an existing model that has already been reblocked, use the drop-down lists to select the appropriate files from your current working directory, or click the browse buttons to select them from another location.
Note: When a block model is selected, the coordinates of the origin, XYZ offsets, and parent block sizes are automatically filled in on the Dimensions section.
-
Select the Dimensions section and, if necessary, modify the offset and regular block size parameters, as explained below.
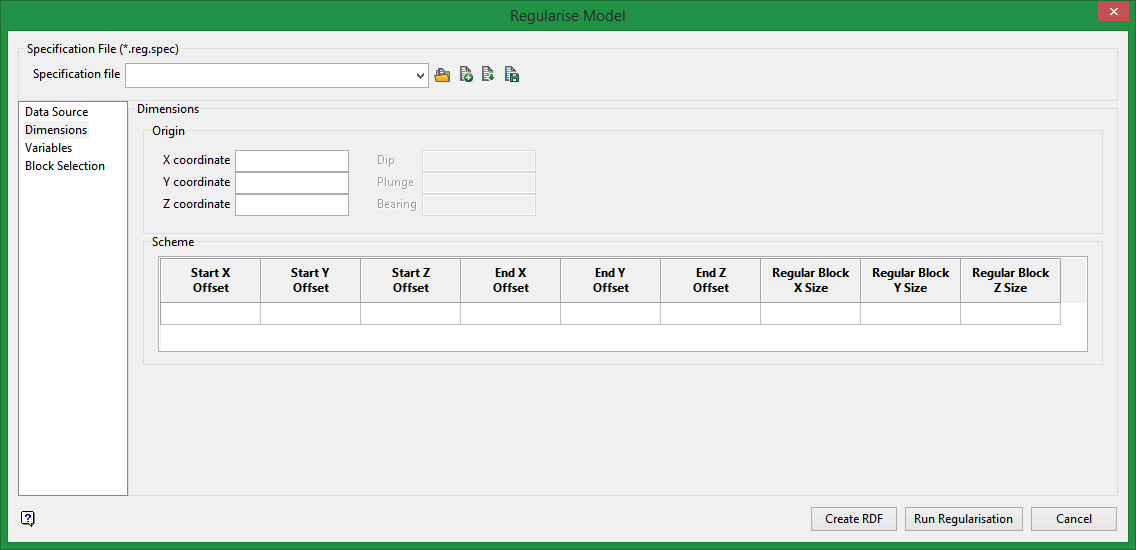
While the origin point and offsets are automatically populated from the block model chosen in the Data Source section, it is possible that the regular block sizes that are filled in are not the sizes best suited for your purposes. To change the size of blocks, simply enter new dimensions into fields Regular Block X Size, Regular Block Y Size, and Regular Block Z Size. The only size restrictions that must be followed are that the block sizes must fit evenly into each direction array. That is, the block size corresponding to Regular Block X Size must fit evenly into the X offset distance. Similarly for Regular Block Y Size and Regular Block Z Size.
-
Complete the settings in the Variables section, as follows:

Note: At least one variable must be either selected from the drop-down list or created as a new variable by typing the name into the Resultant Variable field. If you select a variable from the drop-down list, then all other appropriate fields will be automatically populated. If you define a new variable, then you will need to define any other appropriate fields as well.
-
Resultant Variable:
Enter the name of the variable to create in the new model. The maximum size is 30 alphanumeric characters.
-
Default value:
Enter the default value. The following characters may be used in combination with the default value, but not on their own:
[ ] ( ) { } %, + - * / &.Note: We recommend that the default value is not a true value, that is, the default value does not occur in the block model. The reason for this is that in reserves reporting, default values are reported as an unknown category. For example, if you assign
2.8as the default value for SG, and 2.8 happens to also be the global block SG value, then the reserves calculation will report the true 2.8 values in the wrong category (the unknown category). It is therefore better to use a non true default value such as-99and then run a script to re-assign all blocks to 2.8. This way the blocks with SG = 2.8 will be reported in their correct category.Important: Byte and short data types must not have a negative default value because they are unassigned.
-
Data Type:
The following data types are available:
-
Name - This is used for character type data. It is only possible to add one character type variable at a time. The description is entered in the Description field.
-
Byte - <Integer * 1 > - This uses a single byte of memory. Using byte data type saves significant memory particularly if you have a rock code that is an integer in the range 0 to 255.
-
Short <Integer * 2 > - This is a short integer taking two bytes of memory in the range -32767 to +32767.
-
Integer <Integer * 4 > - This is a fixed point number (-2,147,483,648 to +2,147,483,647).
-
Float - <Real * 4 > - This is a real number. It is generally used for single precision numerical data codes such as grades and densities - up to seven significant figures.
-
Double - <Real * 8 > - This requires two consecutive storage units providing greater precision than real number types and is used for numbers up to 14 significant figures.
Note: Variables to be used as the estimated grade in grade estimation must be of a float or double data type.
-
-
Regularisation Method:
The regularisation methods calculate variables using sub-blocks, regular blocks, and common blocks. Common blocks are generated when a regular block intersects sub-blocks.
In Figure 1, R indicates the regular block, S the sub-blocks, and C the common blocks. The number of sub-blocks intersected by a regular block is denoted by NSB in the descriptions and equations for the regularisation methods below.
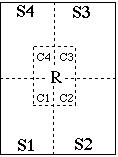
Figure 1: Example of Common Blocks
Available regularisation methods are as follows:
-
Default:
This method uses the Default Value specified earlier in the grid.
-
Majority:
This method calculates the ordinal value that occupies a majority of the regular block's volume. The input and output variable types should be byte or integer. Floating point variables are truncated. The calculation may be defined as follows:

Note: In case of a tie between common blocks of different values, where they occupy the same proportion of the regular block's volume, the lowest numerical value takes precedence in determining the regular block's value. For name-type variables, the associated translation table will be used to obtain the numerical value for a given string, and the lowest numerical value will be determined that way in case of tie
-
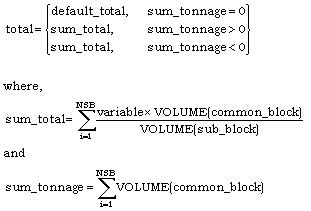
Total:
This method calculated the total of the variable from the sub-blocks intersected by the regular block. The calculation may be defines as follows:
-
Average:
This method calculates the average of the variable from the sub-blocks intersected by the regular blocks. The drop-down list will only contain float and double type variables. The calculation may be defined as follows:
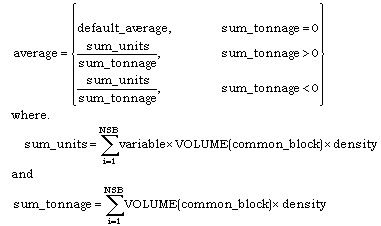
Note: If density weighting is not used, then the density value will default to '1', which is the same as not using a weight at all. Otherwise, the specified density value or sub-block density variable is used.
-
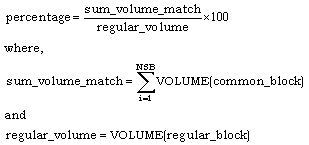
Percentage
This method calculates the percentage of the regular block volume occupied by sub-blocks matching a specified ordinal value. The input variable type should be byte or integer, and the output variable type should be floating point. The number of sub-blocks intersected by a regular block and also matching the given ordinal value is denoted by NSB'. The calculation may be defined as follows:
-
-
Percentage:
If you chose Percentage as the regularisation method, enter a percentage value.
-
Weighting:
Select a weighting type to use from the drop-down.
-
None to give each sample equal weight.
-
Weighting Value to apply a weighting value. Enter a value in the Weighting Value column.
-
Weighting Variable to multiply the sample weights by the value of the specified weighting variable. The weighting variable may represent a specific gravity, sample length or sample weight. Select the appropriate variable from the Weighting Variable drop-down.
-
-
-
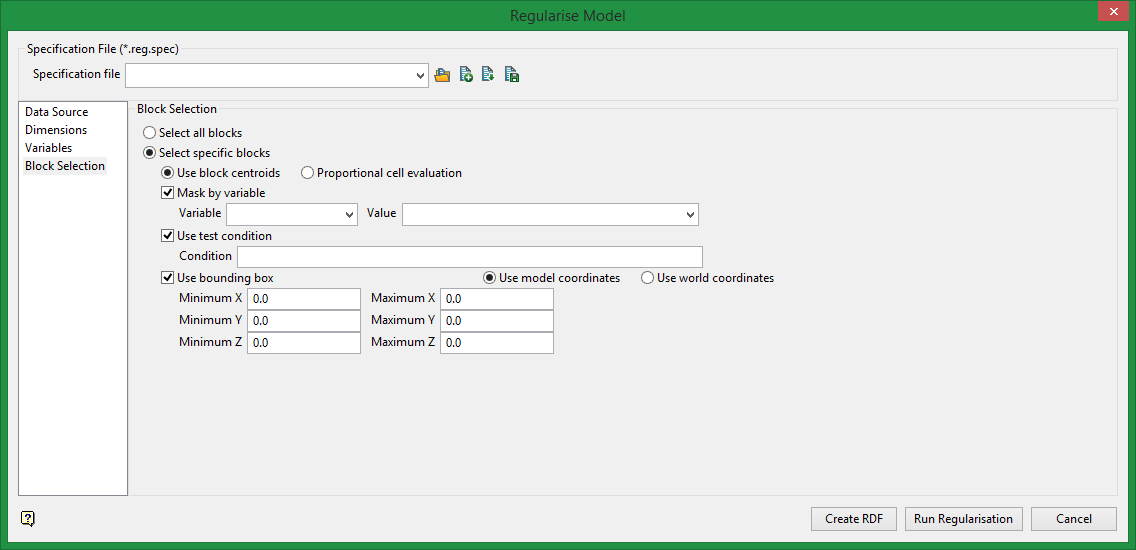
In the Block Selection section, choose between the following options:
-
All blocks to use all blocks in the model. Go to step 7.
-
Specific blocks to specify which blocks to use in the model. Set the remaining options as follows:
-
Select Use block centroids to include any blocks whose centroids are within the region (if any are provided in the block selection tab).
Or
-
Select Proportional cell evaluation to include all blocks that touch the region, and evaluate reserves according to the proportion of the block's volume that lies within the region. Proportional cell evaluation calculates and reports the exact proportion of a block within a solid triangulation. Only blocks that are fully outside the region are ignored in proportional cell evaluation mode.
-
Mask by variable
Select the Mask by variable checkbox to restrict the blocks by a block model variable. You will need to select the variable and value to mask by from the Variable and Value drop-down lists.
Example: To restrict blocks to those where Material equals Ore, select Material as the variable and
Oreas the value. The block model variable may be numeric, such as the grade variable Au or character, such as Geology variables. -
Use test condition
Select the Use test condition checkbox to use a further constraint upon a numeric block model variable and enter the condition in the Condition field. The maximum size of the condition is 132 alphanumeric characters.
Refer to the appendix, Operators and Functions, for a full list of available operators and functions.
Example: To select only blocks that have an iron value greater than 10.0, you would select the Use condition checkbox and enter
Fe GT 10.0in the Conditions field. -
Use bounding box
Select the Use bounding box checkbox to restrict the blocks by a box. Choose either Use model coordinates or Use world coordinates, then enter the minimum and maximum X, Y, and Z coordinates as opposite vertices of the bounding box.
Note: If the block model origin is set at 0,0,0, then select Use world coordinates for the minimum and maximum X, Y, and Z coordinates. If the block model origin is set at real world coordinates, then enter coordinates for the bounding box that are offset a certain distance from the origin. The distance of offset will be determined by the dimensions of your bounding box. It will be the distance to the minimum and the distance to the maximum X, Y and Z from the origin of the block model.
-
-
-
Click the appropriate button to finish:
- Create RDF to create the reblock definition file.
- Run Regularisation to initiate building the regularised model.
- Cancel to close the operation without saving.
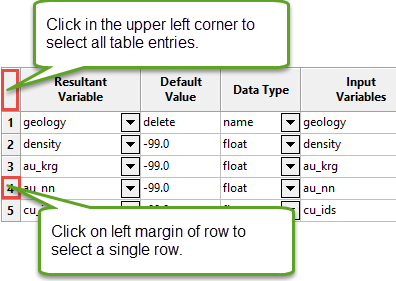
Deleting Variable Entries
If you need to delete any variable entries in the Variables section do the following:
-
Select the entries to delete from the table.
-
Right-click to show the context menu.
-
Click Delete.
