Macro Create
Use this option to record a series of actions that can then be replayed. The recorded actions are saved, into your current working directory, as a Lava script (extension.lava). This can be quite useful if you find yourself routinely performing the same tasks, or you want to produce a recording for a demonstration. To replay your macro, use the Lava option.
As macros are Lava scripts, you can use your knowledge of Lava to edit macro scripts. Example macro files are included in Appendix H.
It is possible to create macros that record the starting of any menu option, the completion of panels and the creation of points. The Run Command option can also be used to incorporate external programs (scripts) into your macros.
Changes to the view, such as rotating and zooming, cannot be recorded when creating a macro. However, it is possible to record the current view or window. It is also not possible to run a Lava script, or record another macro, while replaying/creating a macro.
Two examples are included at the end of this section.
Note: As macros are based on panel names, panel contents, and workflows, such as picking objects, macros created in earlier versions may not work in later versions. For example: if a panel included in your macro is slightly different in a later version, then the macro may fail. As this failure may be subtle, you should test your macros in a new version prior to using them.
Instructions
On the File menu, click Macro Create to display the Save Macro As panel.
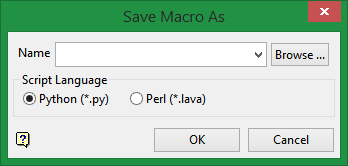
Name
Enter, or select from the drop-down list, the name for the macro. If you select an existing macro, then you will be asked to overwrite it. The lava extension is added automatically.
Script Language
Select between Python or Perl.
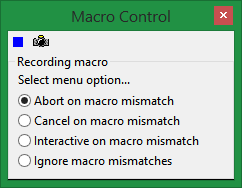
The Macro Control toolbar is then displayed.
There are six (6) different variations of this toolbar. For reference information of the different variations refer to the Macro Control toolbar documentation.
The above variant is always displayed when you start recording a macro.
From this panel you must select your method for dealing with macro mismatches. A macro mismatch is when events were recorded in a different order than the system expects when the macro is being replayed or when the state of the system has changed. For example: when you create points for the first time you need to allocate a layer, however, this is not necessary for subsequent point creations. Thus a macro mismatch is created.
We recommend that you use the Abort on macro mismatch option, as you will then be aware of any errors in your macro.
It is possible to change methods while recording macros if you are between menu options.
Abort on macro mismatch
Terminates the replaying of the macro.
Cancel on macro mismatch
When replaying the macro the menu option that caused the mismatch is cancelled. The macro then continues from the next menu option.
Interactive on macro mismatch
Allows you to deal with the macro mismatch.
Ignore macro mismatches
The macro will continue through its input list until it finds a match.
Once you have selected your method for dealing with macro mismatches, perform the actions that you want to record.
Different variants of the Macro Control toolbar displays depending upon your actions. For reference information on each variation of this panel refer to the Macro Control toolbar documentation.
Although it is not possible to record changes to the view, such as rotating or zooming onto an object, it is possible to record a view and/or set the active window. The Camera button  on the Macro Control toolbar to record the view, such as the angle of rotation, slice view etc., as well as the current Vulcan window being displayed, for example Primary Window or Symbol Editor Window. The best way to use this feature is to change to the view you want to record, select File > Macro Create, allocate a name to your macro and then select the Camera button . When you run the macro the view is changed back to the recorded view. A similar effect to saving the view as a numbered view is achieved.
To stop recording, click the Blue Square  on the Macro Control toolbar.
Examples
Expand below to see
You are going to record a macro that will create a cube when it is played. The recording of this macro is designed to take place on first starting Vulcan, that is you have not selected a layer in which to create design data.
From this example you will learn about the Mismatch Macro, Panel Inputs and Get Point variations of the Macro Control toolbar.
For ease of creating the cube, have a grid displayed on the screen.
-
Select the Macro Create option.
-
Give your macro a name, that is cube. Remember it is not necessary to add the lava extension.
-
From the Macro Control toolbar, select the Abort on macro mismatch option.
-
Select the Create Line button from the Design toolbar. Alternatively, you can also select the Line option from the Design > Create submenu.
-
The Panel inputs version of the Macro Control toolbar will then be displayed.
From this panel, check the Optional panel checkbox. This selection will mean that a mismatch will not occur, as this panel will only be replayed if the system requires it. You must also choose either the Interactive or Use these values option. If the panel is required and you have selected Interactive, then you will be prompted to complete the panel when replaying the macro, otherwise the values you entered when recording the macro will be used and the panel will not be displayed.
-
Enter the layer name Cube and the description CubeExample:
-
The Get Point version of the Macro Control panel will then be displayed.
From this panel, select the Interactive - single point option. This will mean that when the macro is being replayed you will be prompted to indicate a point.
-
Use the Snap to grids mode to digitise the point.
A grid must be displayed on the screen to use this mode. Click on the Grid Properties button (on the Graphics toolbar ) to display a grid. If you want to alter the grid properties, that is the colour or the distance between grid lines, then right-click on the button. -
The Relative option on the Macro Control toolbar will then be enabled (no longer be shadowed). Select the Relative option. This will mean that all the points created will be relative to the previously created point.
-
Use the Snap to Grids mode to digitise a square. You will need to redigitise the first point to close the square.
-
Change the z default value by the side length of the square, that is, if your square has a side length of 100, then increase the default Z value by 100.
-
Digitise a square exactly on top of the existing square. Start from the same vertex as you did when you created the original square.
-
Right-click once to cancel creating the line.
-
Digitise another vertex of the square, that is, not the vertex with which you completed the square.
-
Change the default Z value back to its original value.
-
Redigitise the vertex. This will create a line between corresponding vertices on the two squares.
-
Right-click to cancel creating the line.
-
Digitise another vertex.
-
Change the default Z value by the side length of the square, that is if your square has a side length of 100, then increase the default Z value by 100.
-
Redigitise the vertex.
-
Right-click to cancel creating the line.
-
Digitise the remaining vertex.
-
Change the default Z value back to its original value.
-
Redigitise the vertex.
-
Right-click twice to cancel creating the line and then to exit the create line option.
Use the rotate icons to view your cube. Remember changes of view are not included in the macro. -
Select the Stop button to stop recording the macro.
-
Right-click to exit the Macro Create option.
-
To replay your macro:
- Select the Lava option (under the File menu).
- Enter, or select from the drop-down list, your macro name.
- The macro will be played. Any prompts will appear in the Status Bar (as they do for normal Vulcan operations).
While your macro is running you can use the Stop button on the Macro Control toolbar to stop it replaying.
For this example you need to have objects, which are parts of groups, displayed on the screen.
-
Select the Macro Create option.
-
Give your macro a name, that is delete. Remember it is not necessary to add the lava extension.
-
From the Macro Control toolbar select the Abort on macro mismatch option.
-
Select the Delete button from the Modify toolbar.
-
From the Macro Control toolbar, select the By attribute option. This means that both the attribute that you select (that is Object, Group and Layer, Feature and Layer, Layer, Group, Feature and Name) and the attribute values (that is if you selected group as your attribute and then selected the group named CUBE, then the CUBE group will be deleted every time you run the macro) are used when you replay the macro.
The Multiple Selection box and the Select Object variant of the Macro Control toolbar are then displayed. If you select Interactive, then the multiple selection box is displayed, when the macro is replayed, from which you can choose a method for selecting objects. If you select Interactive by Criteria, then the attribute that you select will be used when the macro is replayed, but you can select the attribute value. For example if you selected layer when creating the macro, when replaying the macro you can select the actual layer to be deleted.
-
From the multiple selection box, select Group.
-
Select an object from the group that you want to delete.
-
Confirm the group selection and the deletion.
-
Cancel deleting objects.
-
Select the Stop button to stop recording the macro.
-
Right-click to exit the Macro Create option.
-
Select the Undo button on the Standard toolbar to return the objects that you have just deleted. If you do this, then you can test your macro.
-
To replay your macro:
- Select the Lava option (under the File menu).
- Enter, or select from the drop-down list, your macro name.
- The macro will be played. Your objects should be deleted.
