Total Volume In Place
The option is a compositing and classification procedure for block model columns and exploration drillhole database. The option will result in a series of top surfaces (structure roofs) and bottom surfaces (structure floors) for each of the possible mining horizons (ore benches). Waste benches are implied as overlying and intermediate horizons between benches.
This option will also create an ultimate pit bottom surface, defining the depth limit of mining according to the mineability, grade, and total volume of material:bitumen volume in place (TV:BIP) parameters that are used as inputs.
The following steps will produce a mineability and composite grade result:
- Calculate mineable horizons by compositing and classifying possible internal waste burdens using minimum mineable thickness and minimum separable waste thickness logic.
- Calculate roof and floor points for each mineable horizon identified in step 1 for each column in the block model or drillhole database.
- Calculate the composited percent bitumen grades for the mineable horizons, with options on how waste grades are used in the composited mineable thickness grades.
- Determine the ultimate mining floor, or pit bottom, using variations on the TV:BIP ratio as a determining cutoff. Available options are:
- Incremental ration of each individual waste/ore horizon, with the pit bottom defined as the top of the first waste/ore above ratio cutoff.
- Cumulative ratio of each waste/ore horizon, progressively calculated down through the sequence until the ratio exceeds the cutoff. Pit bottom is defined as the top of the waste/ore horizon which forces the cumulative ration above cutoff.
- Calculate and save pit bottom floor points according to the TV:BIP ratio cutoff procedure in step 4, and record the ultimate TV:BIP ratio with these points.
Instructions
On the Open Pit menu, point to Oilsands Options, then click Total Volume In Place.
Specification
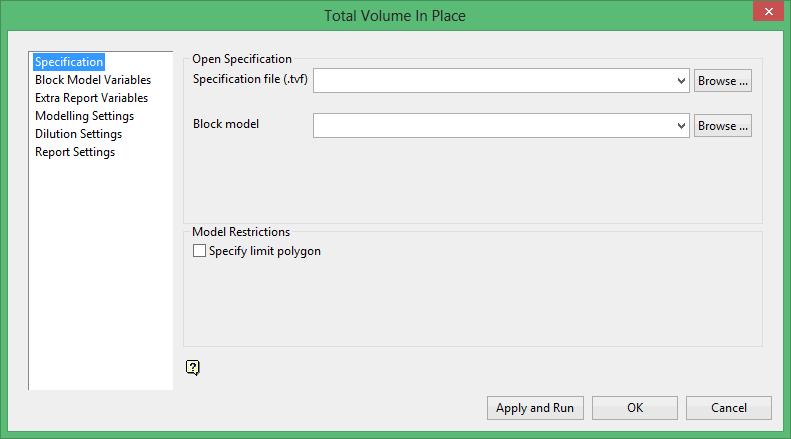
Follow these steps:
-
Enter, or select from the drop-down list, the name of the Specification file that you want to load. The drop-down list displays all tvf files found in the current working directory. Click Browse to select a file from another location. Once a file has been chosen, the parameters will be used to populate various fields.
To create a new file, enter the file name and file extension.
-
Specify the name of the Block model to use. The drop-down list contains all block models found within the current working directory. Click Browse to select a file from another location.
-
Enable Specify limit polygon under Model Restrictions to limit the blocks calculated in the total volume in place to only those contained in a specific polygon.
Block Model Variables
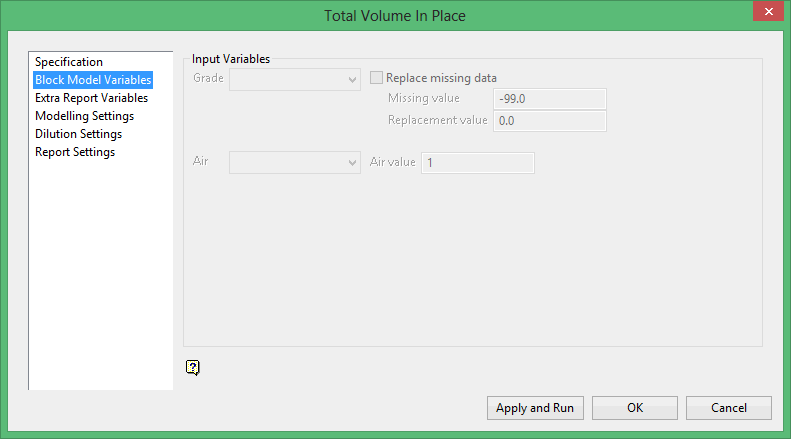
Follow these steps:
-
Select the Grade variable from the drop-down list of variables for the currently selected block model. Typically, for an oil sand deposit, this will be bitumen, measured in percentage of total mass.
-
Enable Replace missing data to activate functionality that enables Vulcan to assign a replacement value when missing data is found. For example, assume that missing values are assigned the value -99.0. Whenever Vulcan reads -99.0, it will acknowledge this as missing data. As it is missing data, Vulcan will automatically replace the -99.0 with the value defined in the Replacement value field.
-
Enter the specific value that is to be identified as being missing data.
-
Enter the value that should be used to replace the missing value that you have specified.
-
Select the input variable for Air from the drop-down list of variables in the currently selected block model that contains a flag for air blocks above the topography, (For example, air_flag).
-
Enter the Air value to be assigned to intercepts that are found to be comprised of air. Typically, the air flag variable that was previously selected contains a specific value for blocks above the current topography, and often this value is 1.
Extra Report Variables
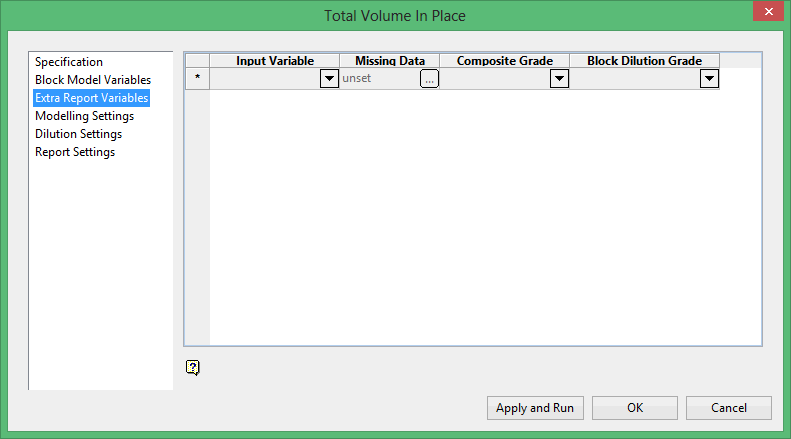
Follow these steps:
-
Select any other input grade variables from the Input Variable drop-down list of variables in the currently selected block model and you would like to calculate the composited grade values for mineable intervals resulting from this process.
-
Specify how missing data is to be treated when encountered in the Missing Data column. This must be done for each Input and resultant variable. Select the
 to display the Missing Data Settings panel.
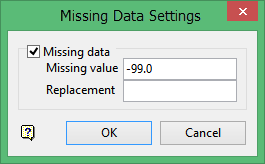
-
Enable Missing data to activate functionality that enables Vulcan to assign a replacement value when missing data is found.
-
Enter the Missing value that is to be identified as being missing data.
-
Enter the Replacement value that should be used to replace the missing value that you have specified
-
Modelling Settings
Follow these steps:
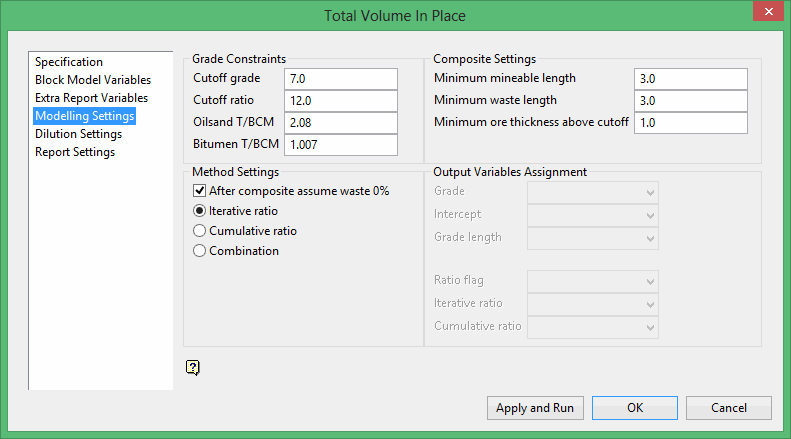
Grade Constraints
-
Enter the Cutoff Grade. This is the percentage of bitumen that a block must fall below in order to be considered waste. The default value is 7.0.
-
Enter the Cutoff ratio. This value refers to the cutoff under which a waste/ore package is considered mineable. There are two methods used in applying this cutoff; cumulative ratio calculation and incremental ratio calculation.

The bitumen grade of waste can be considered as estimated insitu (grade stored in each interval) or zero (default setting for all intervals or blocks less than the cutoff bitumen grade).


-
Enter the value for Oilsand T/BCM. This is the density of oil sands material (in tonnes/m3). The default value is 2.08.
-
Enter the value for Bitumen T/BCM. This is the density of bitumen material (in tonnes/m3). The default value is 1.007.
-
Composite Settings
Enter the Minimum mineable length. This is the minimum mineable thickness of an ore bench. The default value is 3.0.
Example: If three 1 metre thick blocks in a vertically contiguous sequence satisfy the grade cutoff criteria, then this sequence will be identified as a possible mineable ore horizon.
-
Enter the Minimum waste length. This is the minimum mineable thickness of a waste bench. The default value is '3.0'. This value is also known as the minimum separable parting when referring to interburden horizons.
-
Method Settings
Enable After composite assume waste 0%. (Optional) This option affects the dilution of ore mineable horizons/benches and determines how the average grade of the entire bench is calculated with respect to the below cutoff or waste blocks. If this check box is checked, then the included waste blocks are weighted into the bench grade composite with a 0.0 grade. If this check box is not checked, then the included waste blocks will contribute the estimated grade to the bench grade composite.
Note: We recommend that you ensure that a valid grade is present when this check box is not checked. If negative or default grades exist in the bench, then this will result in composite averaging errors.
-
Select the calculation method to use when trying to determine the ultimate pit bottom.
-
Iterative ratio - Starting at the surface, if the incremental waste/ore package has a ratio that is less than the specified cutoff ratio, then the next incremental waste/ore package ratio will be tested. This process is repeated until one of the packages fails, resulting in the floor point of the last successful package being outputted to the designated layer.
-
Cumulative ratio - Starting at the surface, if the first incremental waste/ore package has a ratio that is less than the specified cutoff ratio, then the cumulative ratio from the surface to the base of the second waste/ore package will be calculated and compared to the cutoff. This process is repeated until one of the ratios exceeds the specified cutoff ratio, resulting in the base of the mineable being found and a point being created at the pit bottom.
-
Combination - This method performs both the cumulative ratio calculation and the iterative ratio calculation and will locate the pit bottom at the lowest block which satisfies BOTH methods.
-
-
Output variables
Select the output Grade variable from the drop-down list of variables in the currently selected block model that contains the individual mineable horizon percent bitumen composite grade values.
-
Select the output Intercept variable from the drop-down list of variables in the currently selected block model that contains the separate mineable interval number, as numbered from the top down (For example, 1, 2, 3, etc.).
-
Select the output Grade length variable from the drop-down list of variables in the currently selected block model that contains the thickness of each mineable horizon.
-
Select the output Ratio Flag variable from the drop-down list of variables in the currently selected block model that defines the value where the ratio of total volume to bitumen in place will be stored.
-
Select the output Iterative ratio variable from the drop-down list of variables in the currently selected block model that defines the value where the ratio of total volume to bitumen will be stored for the iterative ratio calculation method.
-
Select the output Cumulative Ratio variable from the drop-down list of variables in the currently selected block model that defines the value where the ratio of the total volume to bitumen will be stored for the cumulative ratio calculation method.
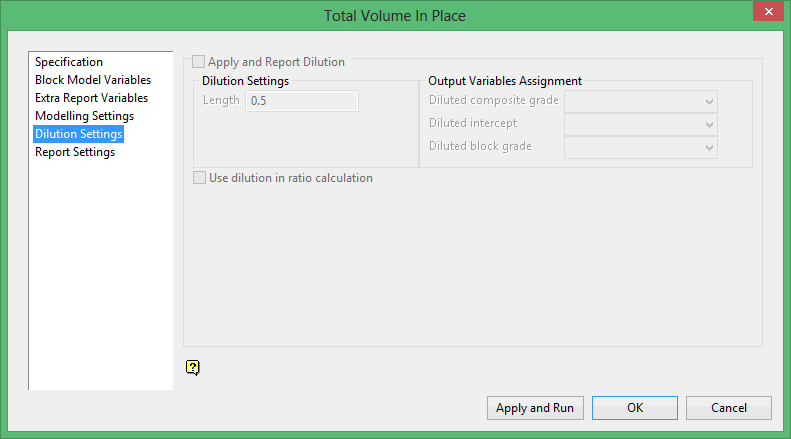
Dilution Settings
Click Apply and Run to calculate the Total Volume to Bitumen in Place. Details of the process will be written to the Report Window, and progress displays on the screen.
Click OK to save the information in the currently open specification file before exiting the Block Model Variables interface.
Report Settings
Follow these steps:
-
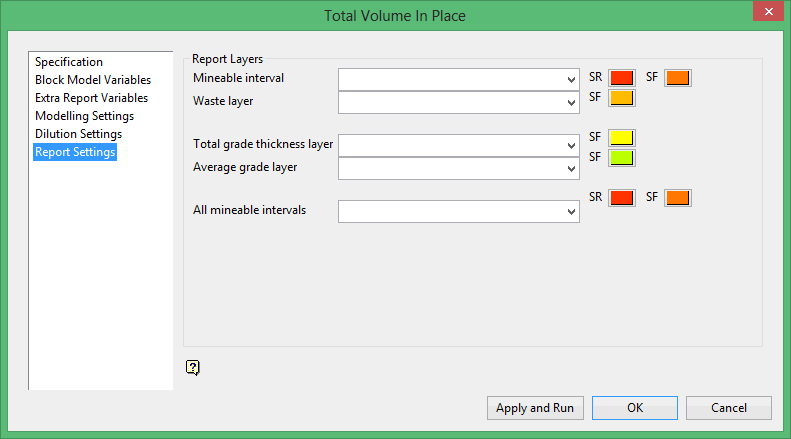
Select the Mineable interval layer to send the output of the points that represent the top (SR) and bottom (SF) of each mineable interval to. The W-tag for the points contains the composite index number, that is, the mineable horizon numbered from top down: 1, 2, 3 etc. The available drop-down list contains the names of all layers found in the currently open design database.
You will also be required to nominate the colours that will be used to represent the top (SR) and bottom (SF) of each mineable interval. In the following diagram, the SR point is coloured purple and the SF point is coloured red.
-
Select the Waste layer layer to send the output for the point that stores the cumulative thickness of each column to. This point will be used to indicate the base of mineable sequence or pit bottom. The W-tag for the point contains the cumulative thickness of waste contained in the mineable sequence.
You will also be required to nominate the colour that will be used to represent the point. In the following diagram, the point is coloured green.
-
Select the Total grade thickness layer to send the output for the point for each block model column that stores the thickness of the ore. The points will be used to indicate the base of mineable sequence or pit bottom. The W-tag for the point contains the cumulative thickness of ore contained in the mineable sequence.
You will also be required to nominate the colour that will be used to represent the points. In the following diagram, the point is coloured white.
-
Select the Average grade layer containing a point for each block model column that stores the average bitumen grade to. The points will be used to indicate the base of mineable sequence or pit bottom. The W-tag for the point contains the average grade of the grade variable contained in the entire mineable sequence.
You will also be required to nominate the colour that will be used to represent the points. In the following diagram, the point is coloured blue.
-
Select the All mineable intervals layer to output the points that represent the top and bottom of each mining interval to. This layer will store the structure roof and structure floor for the total mineable horizons.
You will also be required to nominate the colours that will be used to represent the top (SR) and bottom (SF) of the total mineable horizon.
-
Click Apply and Run to calculate the Total Volume to Bitumen in Place. Details of the process will be written to the Report Window, and progress displays on the screen.
-
Click OK to save the information in the currently open specification file before exiting the Block Model Variables interface.
