Advanced Object Label
Use this option to generate labels based on selected attributes. Labels can be generated as layers or as temporary labels. Labels generated as layers are permanent and can persist over multiple Vulcan sessions, whereas labels generated as temporary labels will not persist and must be regenerated each time an object is loaded.
Click for instructions to remove labels.
|
Note: To view the labels again without reentering the details into the Advanced Object Label panel, follow these steps:
|
Instructions
On the Analyse menu, point to Label, and click Advanced Object Label to display the Advanced Object Label panel.
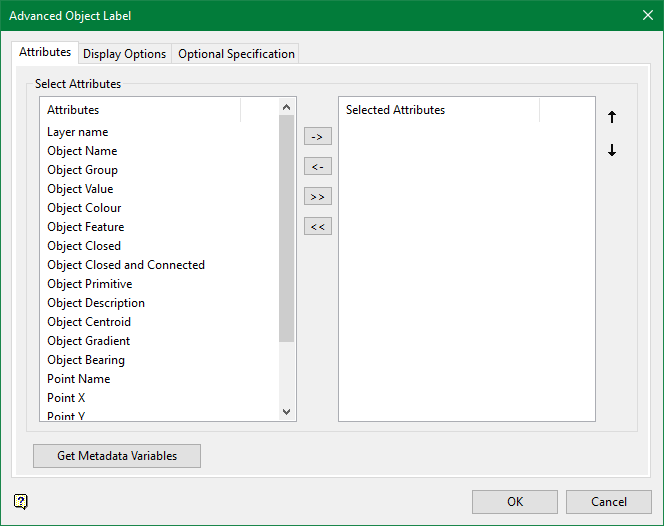
Attributes
Selected Attributes
Select the attribute(s) that will appear as part of the label.
-
To select individual attributes, click on the attribute name in the Attributes column and then click
 to move the attribute to the Selected Attributes column.
 -
To remove the attribute from the Selected Attributes column, click
 to move the attribute to the Attributes column.
 -
To move all attributes, click
 or
or 
Get Metadata Variables
Click this button to populate the Select Attributes list with any metadata specification file found within the working directory. The specification file will have a file extension format of <FILENAME.MDS>. Once the metadata specification file is listed in the Select Attributes pane on the left side it can be selected and moved over to the Selected Attributes pane on the right side.
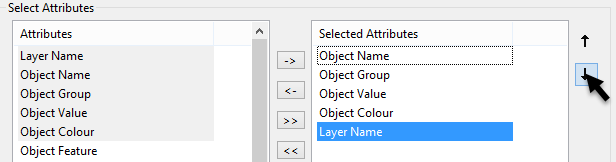
Arranging the order of items in the label
When all the attributes for the label have been selected, they can be arranged in any order. To change the label position, highlight the attribute and then click the up or down arrow to move its position in the list.
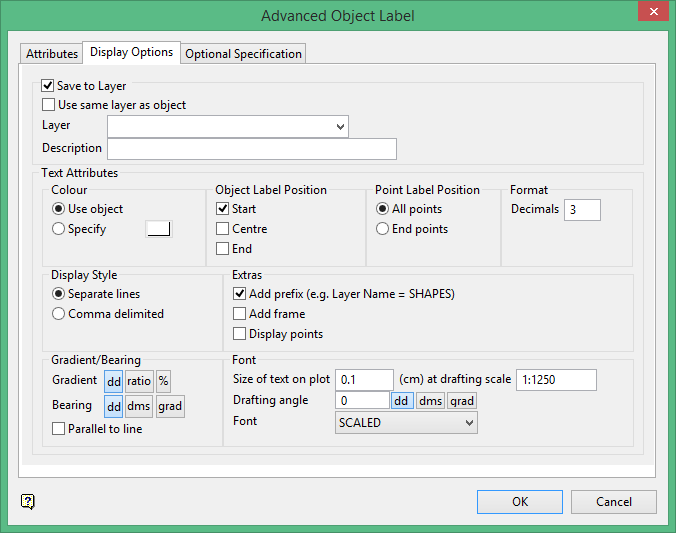
Save to Layer
Select this option to save the label to a layer.
Use same layer as object
Select this option to save the label(s) in the same layer as the object instead of in a separate layer.
Layer name
Select a layer from the drop-down list, or enter a name for a new layer. The name of the new layer:
-
may contain up to 40 characters,
-
must begin with an alphanumeric character [0-9] or [a-z],
-
cannot include spaces,
-
can include hyphens [ - ], plus signs [ + ], underscores [ _ ], periods/dots [. ],
-
can include the special characters of ÁÂÃÀÇÉÊÍÓÔÕÚÜÑ that are used in the Spanish and Portuguese languages.
Description
Enter a description to further describe the contents of this layer. The maximum length is 80 alphanumeric characters. Spaces are allowed. If a description is not entered, then a default description is used. If the chosen layer already has an assigned description, then this will be displayed when the layer is selected. Existing layer descriptions can be overwritten.
Text Attributes
Colour
Use object
Select this option if you want the labels to inherit the colour of the original object.
Specify
Select this option if you want the exported labels to be coloured using the current palette.
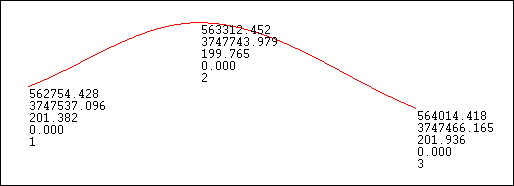
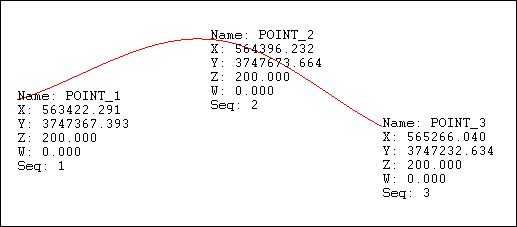
Object Label Position
This position is referring to the point sequence.
Point Label Position
Select whether the label will be displayed at the end point or at all points. Keep in mind that if you select to display the labels at all points and you have a lot of attributes selected it could be memory intensive, especially if the object you are labelling consists of many points.
Format
Select the level of precision you wish to display in the number attribute fields.
Display Style
This section is only available when one or more labels are being sent to a Vulcan layer.
Separate lines
Select this option to display each label on a separate line.
Comma delimited
Select this option to display each label on the same line with a comma separating each value.
Extras
Add prefix
Select this option to apply a prefix to each of the chosen labels.
Add frame
Select this option to display a box around the text to frame the labels.
Display Points
Select this option to add a point marker to each point.
Gradient/Bearing
Gradient
The gradient can be displayed in decimal degrees ( nnn.n ), as a ratio ( 1:nnnn ) or as a percentage grade ( nnn.n% ).
The resulting label can contain up to 6 decimal places.
Bearing
The bearing angle can be displayed in decimal degrees (dd); degrees minutes seconds (ddd.mm.ss) or gradients (grad).
The preferences for the number of decimal places is set at Workbench > Preferences > Miscellaneous > Label Decimal Places.
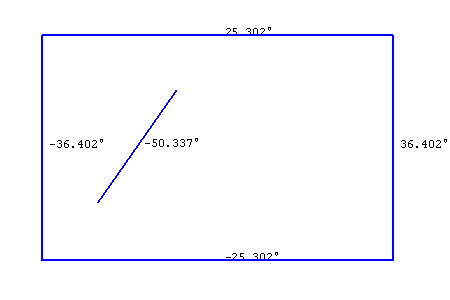
Parallel to line
Select this option to position the text parallel to the line instead of horizontal.
Font
Size of text on plot
Enter the size, in plotter units, of the text on the plot. The specified value will also be used to define the size of the point markers on the plot.
Drafting scale
Enter, as a ratio, the drafting scale, which is used in conjunction with the text size entered above.
If the text size is set to '0.10' (10 cm), and the drafting scale to '1:1250', then the text will appear on the screen the same size as an object that is 125 units long. Changing the scale, through either this option or the File > Plot > Plot All option to '1:1000' will result in the text appearing the same size as an object that is 100 units long. Changing the scale to '1:10 000' results in a text size of 1000 and so forth.
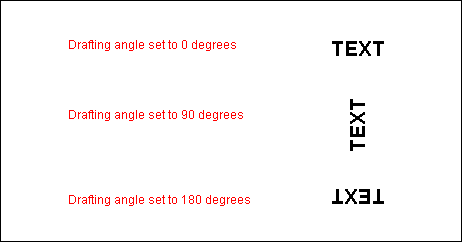
Drafting angle
Enter the angle at which the text block will appear. The resulting text will always be displayed horizontally when viewed onscreen, however, it will appear at the correct angle when plotted.
The drafting angle can be entered in decimal degrees (dd); degrees minutes seconds (ddd.mm.ss) or gradients (grad). To do so, select the appropriate angle format button and enter the drafting angle.
To enter a drafting angle of 50°, select the  button and enter '50' as the drafting angle.
Select a different angle format button to convert a value, for example 50° will become '55.555556' if the  button is selected.
Font
Select a font type from the available drop-down list.
Fixed fonts ('SMALL', 'MEDIUM', 'LARGE', etc.) remain the same size when displayed onscreen regardless of the current zoom, and will always appear 'face on', that is, horizontal, regardless of the drafting angle. Scaled fonts, however, will resize as you zoom and the display will follow the angle set by the drafting angle. Refer to the Introduction : Fonts section for more information on the available font types.
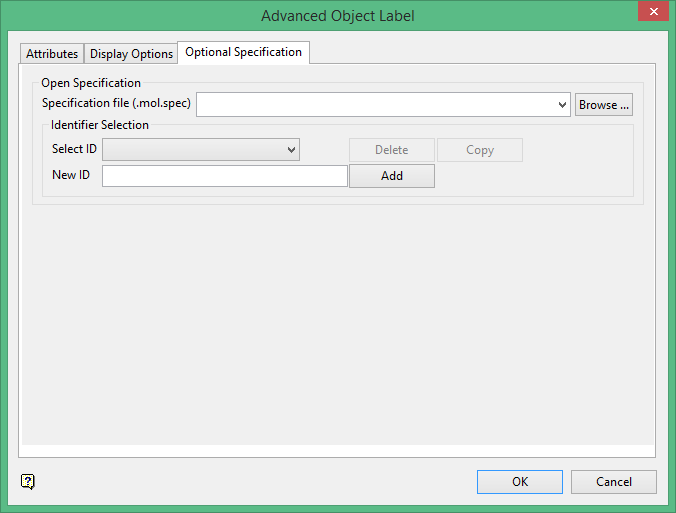
Open Specification (Optional)
Specification file
Select the specification file that you want to use.
The drop-down list contains all < *.MOL.SPEC > files available in the current working directory. Click Browse to select a file from a different location.
Identifier Selection
Select an identifier from the drop-down list, or enter the name of a new identifier.
To create a new identifier, enter the identifier name and click Add.
Removing labels
The steps to remove labels that were generated as layers are different from those that were generated as temporary labels.
Methods to remove labels that were generated as temporary labels:
- Right-click on the text object to display the context menu, then select Label > Remove labels.
- On the Analyse menu, point to Label, then click Remove.
|
Note: To view the labels again without reentering the details into the Advanced Object Label panel, follow these steps:
|
Methods to remove labels that were generated as layers:
- Select the Delete button
 from the Delete toolbar.
 - Select File > Layer > Remove and then select the appropriate layer from the screen.
- Select the label and press the Delete key.
