Import ASCII Data
Instructions
On the File menu, click Import to display the Import panel.
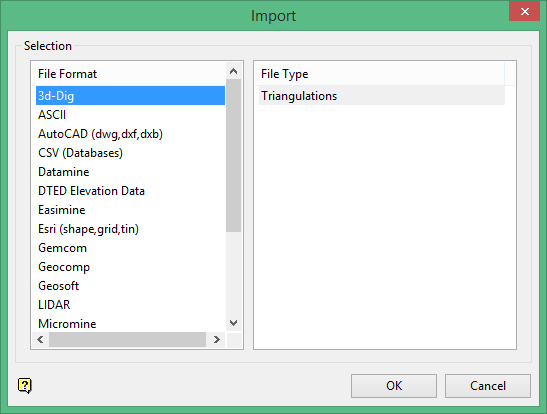
Click ASCII in the File Format column on the left.
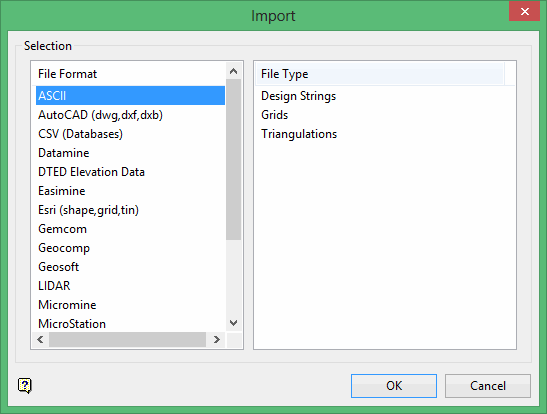
Select Design Strings from the File Type field on the right side of the panel.
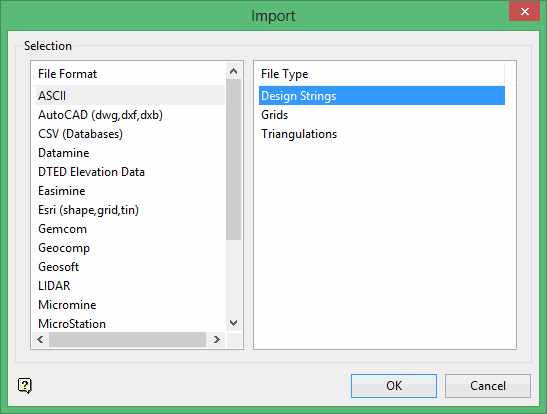
Click OK to display the ASCII Data Read Selection panel.
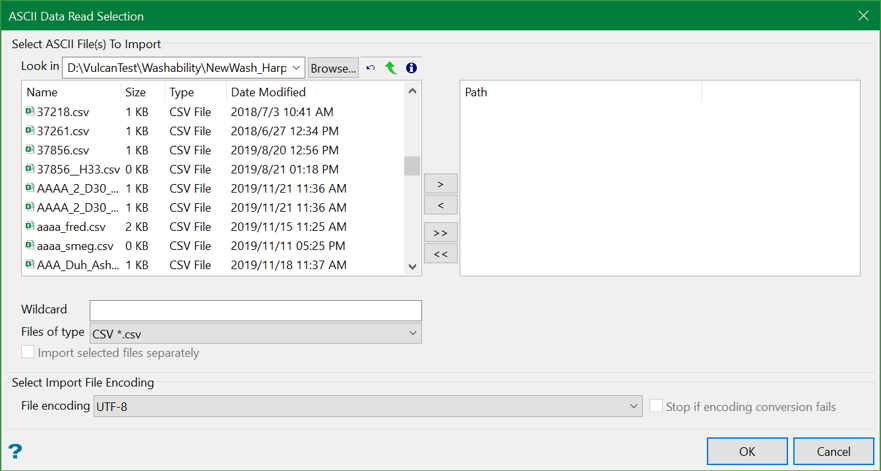
Wildcard
Filter a list of files to be imported using wildcard. Wildcard (*) can be used in combination with strings from filename.
t* lists all the files in that directory whose name starts with the letter 't'.
Press Enter key to see the result.
Files of type
Specify whether the design objects are to be imported from an ASCII, CSV, Text, DAT, Digi or any other relevant file formats.
The ASCII file name must be in lowercase. A maximum of 120 fields can be read.
Import selected files separately
There are two ways of importing the selected files–separately and together. Select this checkbox to import the files separately. This allows to import the selected files one by one and customise the settings of each file separately.
If you choose to uncheck this option (i.e. import the files together), all the files imported will have the same settings.
File Selection
Select the files that you want to import and click -> to move them to the Path column on the right side of the panel, or click >> to select all files. To remove a file, click <-, or click << to remove all files.
Select Import File Encoding
File Encoding
If an encoding other than UTF-8 is selected, the ASCII or CSV file will be converted to UTF-8 before imported to Vulcan.
Stop when encoding converting fails
Select this option is you want the importing process to stop if the conversion fails. If this option is not selected and the process fails, then the importing process will continue with the original file.
Click OK.
The following panel is then displayed. This panel displays for each of the selected files.
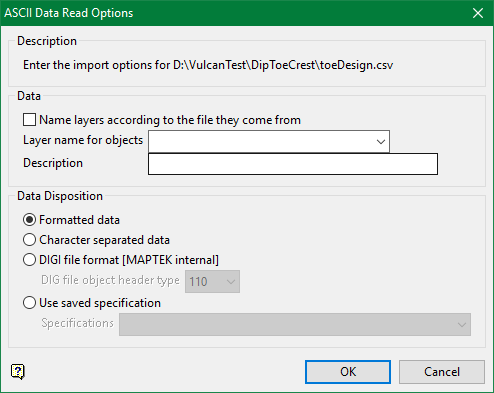
Data
Name layers according to the file they come from
Choose this option if you want the name of design objects to be the name of the file they come from.
Layer name for objects
Enter the name of the layer that will be used to store the imported data. The drop-down list contains the names of all layers found in the currently open design database. If you select an existing layer, then the resulting data will be appended to the nominated layer. If you enter the name of an existing layer that is not currently loaded, then you will need to confirm whether you want to load the layer or replace it, that is overwrite its contents.
To create a new layer, enter the layer name.
Description
Enter a description to further describe the contents of this layer. The description can be up to 80 alphanumeric characters and may include spaces. If a description is not entered, then a default description will be used instead. If the chosen layer already has an assigned description, the description displays when the layer is selected. Existing layer descriptions can be overwritten.
If the data is to be placed in separate layers, then split the data into different files.
Data disposition
There are three available data disposition options:
- Formatted data
- Character separated data
- DIGI file format
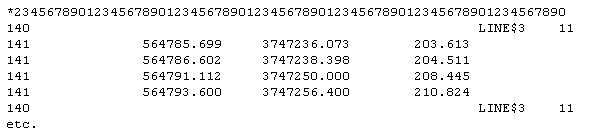
Formatted data (with optional comment line)

Character separated data
Before importing formatted ASCII data, we recommend that you add a comment line with numbers in the data file. This will make the location of columns easier. You can use fields in the ASCII file several times. For example: your ASCII file might contain a field for the W tag, which you use for the W tag and for the point name.
With Formatted data you can even use parts of fields. For example: you might have a field that contains some text and a number, that is LINE_999, and you want to extract only the numeric part for the value. To do this, enter the starting and ending column of the numeric part of the field.
Use saved specifications
The import process will also generate an import specifications file (asciiread.spc), which will be stored in your resources directory, that is the directory pointed to by the ENVIS_RESO environment variable. The drop-down list contains all import settings stored in your asciiread.spc file.
Click OK.
Importing ASCII Formatted Data
This panel is divided into three sections:
- Point Records
- Object Records
- Object Metadata
- Data Format
The Formatted ASCII Data Read panel is the same for these two dispositions. With DIGI files, the fields are automatically populated with the standard DIGI file format. These values can be overwritten.
Point Records tab
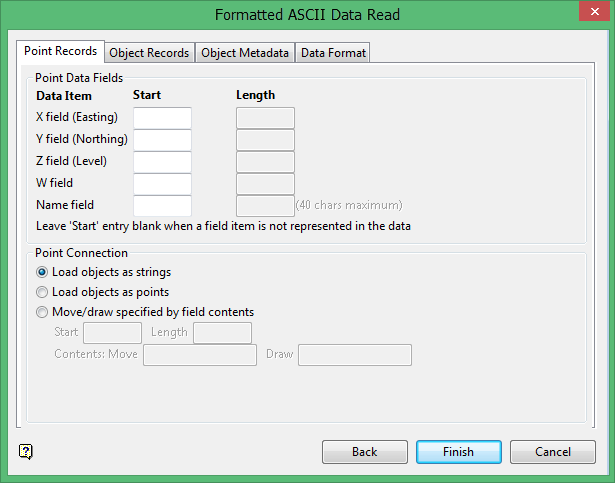
Enter the starting column and length of the X (Easting), Y (Northing), Z (Level), W and Name fields. If no X, Y, Z or W locations are specified, from the mid points of the current window, the default Z and W values are derived from the defaults set through the Status toolbar.
Load objects as strings
Select this option to join the points with lines.
Load objects as points
Select this option to load the objects as individual points.
Move/Draw specified by field contents
Select this option to load objects by a change in the data.
Object Records tab
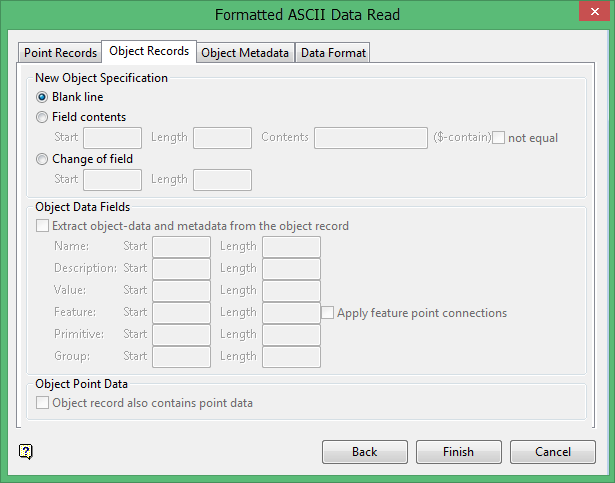
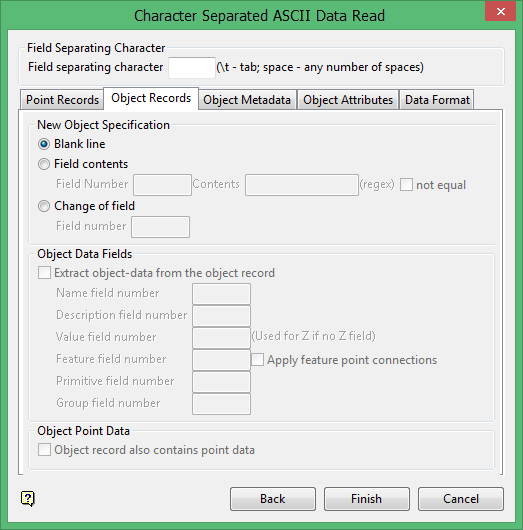
New Object Specification
A data file can contain more than one object. The beginning of a new object can be specified in three ways:
Blank line
Select this option when there is no object data to be extracted. For example, your data might consist of a series of points separated by a blank line.
Field contents
Select this option to specify new objects by entering the start, length, and contents of the field.
Change of field
Select this option if a new object is started when a particular field changes.
If you have selected either the Field contents or Change of field options, then we advise that you complete the Object Data Fields section of this panel. Otherwise, the contents of new object records will be ignored.
Extract object-data from the object record
Select this check box if records that begin a new object (for example due to a field change) contain information about the object. You will need to specify the column numbers for the appropriate attributes.
If you define a feature field, and the field already exists in the features file, then the object will be created with the same colour, line type, and pattern fill as the feature. It will also take the group name and object description from the feature, unless you have defined a field in the ASCII data for the group and description. In the examples above, the object name starts in column 60 and can be a maximum of forty alphanumeric characters in length. If a features file has the group forced on, a value has been specified or a field for the group has not been chosen, then the group from the feature file will be used rather than the default.
Apply feature point connections
Select this check box to override the point connection settings that were specified through the Point Records tab and apply points, line, or polygon as specified in whichever feature the object has. If the object has no feature in the data file, then the settings on the Point Record tab will be applied.
Object record also contains point data
Select this check box If the records contain point data. If the first point is missing from objects or you cannot import single point objects, it may be because this check box has not been selected.
Object Metadata tab

Extract object metadata from the object record
Select this check box if records that begin a new object (for example due to a field change) contain information about the object. You will need to specify the column numbers for the appropriate attributes.
If you define a feature field, and the field already exists in the features file, then the object will be created with the same colour, line type, and pattern fill as the feature. It will also take the group name and object description from the feature, unless you have defined a field in the ASCII data for the group and description. In the examples above, the object name starts in column 60 and can be a maximum of forty alphanumeric characters in length. If a features file has the group forced on, a value has been specified or a field for the group has not been chosen, then the group from the feature file will be used rather than the default.
Data Format tab
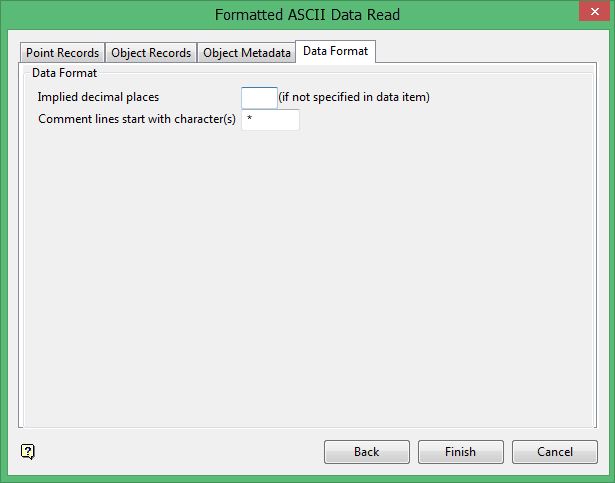
Specify the number of implied decimal places and the character(s) at the start of comment lines. Any numbers in the data that don't have decimal places get the implied number. For example: if the implied number of decimal places is 2, the number 100 becomes 1.00. Numbers in the data that do have decimal places are not changed.
Click Finish.
The following panel is then displayed.
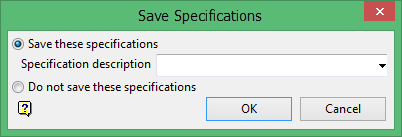
Choose whether or not to save the specifications. If you do choose to save the specifications, then you can select these specifications the next time you import ASCII data. Simply select the Saved specifications option on the first panel.
Save these specifications
Select this option to save the specifications. You will need to enter a description for the specifications (a maximum of forty alphanumeric characters). The Specification drop-down list (on the first panel) contains the descriptions of all of the specifications.
Do not save the specifications
Select this option if you do not want to save the specifications.
Click OK.
The file is then loaded.
The import process will generate an import specifications file (asciiread.spc), which will be stored in your resources directory, that is the directory pointed to by the ENVIS_RESO environment variable.
Importing Character Separated Data
The Character Separated ASCII Data Read panel is similar to the Formatted ASCII Data Read panel described above. The main difference is that with character separated data, the fields are specified by field number rather than by position and length.
Field Separating Character
Enter the separating character in the field at the top of the panel (the default is a space). Any number of spaces in the data is counted as a field separator character. For example, the five spaces in "field.....field" would be counted as the one field separator (spaces indicated as full stops).
This panel is separated into five tabs:
- Point Records
- Object Records
- Object Metadata
- Object Attributes
- Data Format
Point Records tab
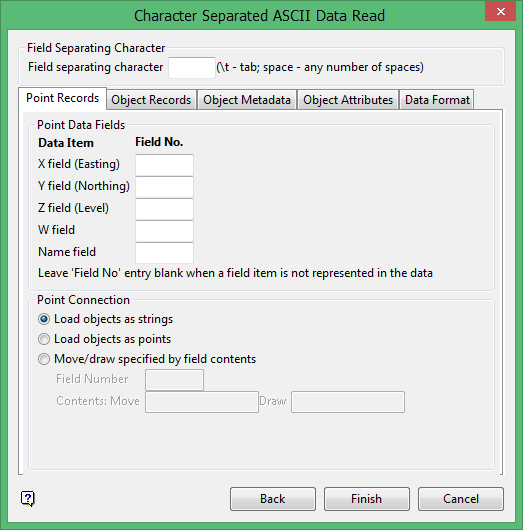
Point Data Fields
Enter the field numbers for the point data.
Load objects as strings
Select this option to join the points with lines.
Load objects as points
Select this option to load the objects as individual points.
Move/Draw specified by field contents
Select this option to load objects by a change in the data.
Object Records tab
New Object Specification
A data file can contain more than one object. The beginning of a new object can be specified in three ways:
Blank line
Select this option when there is no object data to be extracted. For example, your data might consist of a series of points separated by a blank line.
Field contents
Select this option to specify new objects by entering the start, length, and contents of the field.
Change of field
Select this option if a new object is started when a particular field changes.
If you have selected either the Field contents or Change of field options, then we advise that you complete the Object Data Fields section of this panel. Otherwise, the contents of new object records will be ignored.
Extract object-data from the object record
Select this check box if records that begin a new object (for example due to a field change) contain information about the object. You will need to specify the column numbers for the appropriate attributes.
If you define a feature field, and the field already exists in the features file, then the object will be created with the same colour, line type, and pattern fill as the feature. It will also take the group name and object description from the feature, unless you have defined a field in the ASCII data for the group and description. In the examples above, the object name starts in column 60 and can be a maximum of forty alphanumeric characters in length. If a features file has the group forced on, a value has been specified or a field for the group has not been chosen, then the group from the feature file will be used rather than the default.
Apply feature point connections
Select this check box to override the point connection settings that were specified through the Point Records tab and apply points, line, or polygon as specified in whichever feature the object has. If the object has no feature in the data file, then the settings on the Point Record tab will be applied.
Object record also contains point data
Select this check box If the records contain point data. If the first point is missing from objects or you cannot import single point objects, it may be because this check box has not been selected.
Object Metadata tab
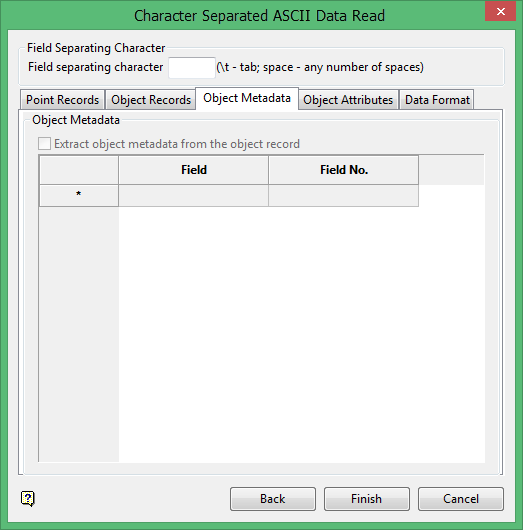
Extract object metadata from the object record
Select this check box if records that begin a new object (for example due to a field change) contain information about the object. You will need to specify the column numbers for the appropriate attributes.
If you define a feature field, and the field already exists in the features file, then the object will be created with the same colour, line type, and pattern fill as the feature. It will also take the group name and object description from the feature, unless you have defined a field in the ASCII data for the group and description. In the examples above, the object name starts in column 60 and can be a maximum of forty alphanumeric characters in length. If a features file has the group forced on, a value has been specified or a field for the group has not been chosen, then the group from the feature file will be used rather than the default.
Object Attributes tab
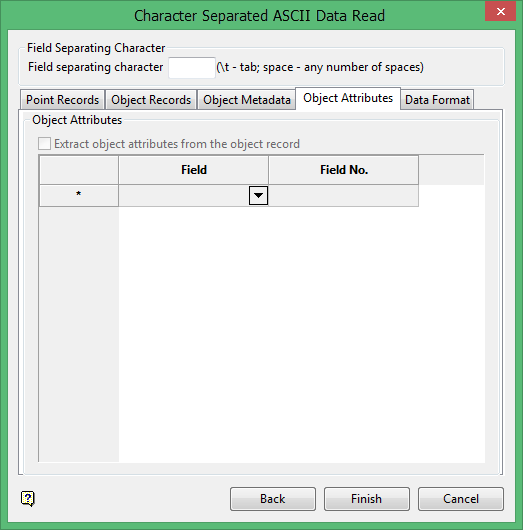
Extract object attributes from the object record
Select this check box if records that begin a new object (for example due to a field change) contain information about the object. You will need to specify the column numbers for the appropriate attributes.
If you define a feature field, and the field already exists in the features file, then the object will be created with the same colour, line type, and pattern fill as the feature. It will also take the group name and object description from the feature, unless you have defined a field in the ASCII data for the group and description. In the examples above, the object name starts in column 60 and can be a maximum of forty alphanumeric characters in length. If a features file has the group forced on, a value has been specified or a field for the group has not been chosen, then the group from the feature file will be used rather than the default.
Data Format tab
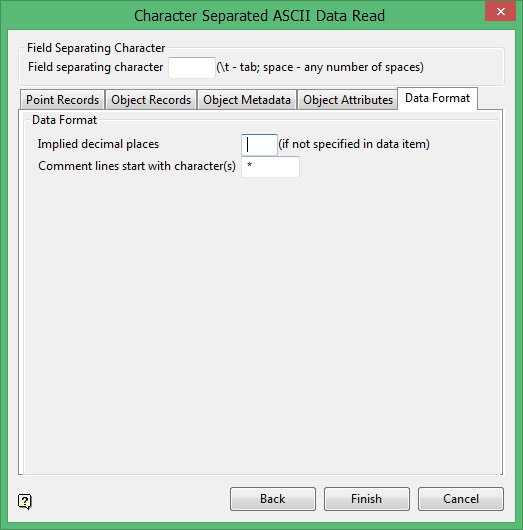
Specify the number of implied decimal places and the character(s) at the start of comment lines. Any numbers in the data that don't have decimal places get the implied number. For example: if the implied number of decimal places is 2, the number 100 becomes 1.00. Numbers in the data that do have decimal places are not changed.
Click Finish.
The following panel is then displayed.
Choose whether or not to save the specifications. If you do choose to save the specifications, then you can select these specifications the next time you import ASCII data. Simply select the Saved specifications option on the first panel.
Save these specifications
Choose this option to save the specifications. You will need to enter a description for the specifications (a maximum of forty alphanumeric characters). The Specification drop-down list (on the first panel) contains the descriptions of all of the specifications.
Click OK.
The file is then loaded.
The import process will generate an import specifications file asciiread.spc, which will be stored in your resources directory, that is the directory pointed to by the ENVIS_RESO environment variable.
