Post Simulation
The Post Simulation option provides all the tools to process the results of a block model used in simulation. The distribution for each block is assembled from the value of each realization stored in the block model variables. With this block distribution several outputs can be obtained, such as the mean, variance, mean above and below a given cutoff, grade for a given probability, probability for a given grade and symmetric interval limits.
Instructions
On the Block menu, point to Simulation, then click Post Simulation.
Follow these steps:
-
Enter a name for the Specification file, or select it from the drop-down list. The drop-down list displays all files found in the current working directory that have the (
.mgs.spec) extension. Click the Browse icon to select a file from another location.
-
Select a Scenario ID. To create a new ID, click the New icon as shown below, and provide a unique name for the current panel settings. Up to nine separate IDs can be created for each
.mgs.specfile.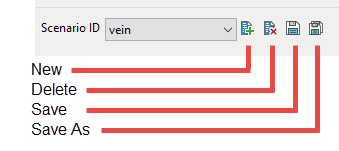
-
Select the Block model from the drop-down list. Click the Browse icon
to select a file from another location. -
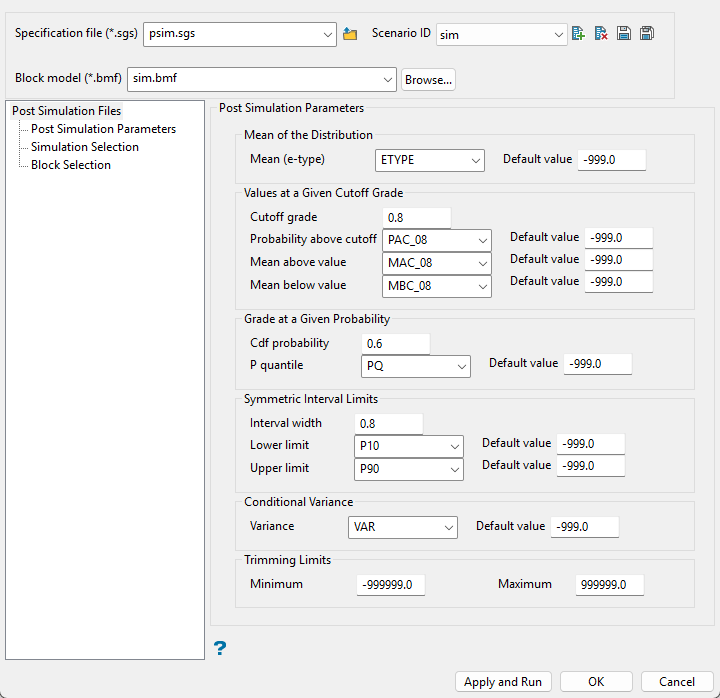
Use this pane to define the variables that will hold the results of the simulation.
-
Specify the block model variable where the Mean (the average of all realisations) for each block will be stored. Provide a default value in case no realization fall within the minimum/maximum trimming limits. If a variable is not supplied, the calculation of the conditional mean from the simulation realisations will be ignored.
-
Use the Value at a given cutoff section to read the conditional distribution based on a given cutoff grade. The cutoff grade will be used to divide the distribution of realisations into a part above the cutoff and another part below the cutoff.
-
Enter a Cutoff grade to use for the analysis. The same cutoff grade will be used for all selected blocks.
-
Specify the Probability above cutoff. This is the block model variable where the probability to be less than or equal to the cutoff will be stored. If a variable is not supplied, then this calculation will be ignored. Provide a default value in case no realisations fall within the minimum/maximum trimming limits.
-
Specify the Mean above value. This is the block model variable to store the mean above the cutoff computed from the distribution assembled from realisations. If a variable is not supplied, then this calculation will be ignored. Provide a default value in case no realisations fall within the minimum/maximum trimming limits.
-
Specify the Mean below value. This is block model variable to store the mean below the cutoff computed from the distribution assembled from realisations. If a variable is not supplied, then this calculation will be ignored. Provide a default value in case no realisations fall within the minimum/maximum trimming limits.
-
-
The Grade at a given probability section is used to read the distribution from the probability axis. At a given probability a grade will be obtained.
-
Enter the Cdf probability (between 0 an 1) to read the grade that correspond to it. For example, if 0.5 is given then the median grade is returned.
-
Specify the P quantile variable where the grade corresponding to the given probability will be stored. Provide a default value in case no realisations fall within the minimum/maximum trimming limits.
-
-
Use the Symmetric interval limits section to find the grades that define a given symmetrical probability interval.
Enter the Interval width of the probability (between 0 to 1). For example a probability interval of 0.5, will be limited by the first and third quartiles.
-
Specify the block model variable where the grade that defines the Lower limit for the given symmetrical interval will be stored. If a variable is not supplied, then this calculation will be ignored. Provide a default value in case no realisations fall within the minimum/maximum trimming limits.
-
Select the block model variable where the grade that defines the Upper limit for the given symmetrical interval will be stored. If a variable is not supplied, then this calculation will be ignored. Provide a default value in case no realisations fall within the minimum/maximum trimming limits.
-
-
Select the block model where the conditional Variance, obtained from the distribution assembled from the realisations, will be stored. If a variable is not supplied, then this calculation will be ignored. Provide a default value in case no realisations fall within the minimum/maximum trimming limits.
-
Define the minimum and maximum Trimming limits. These are the acceptable values for the simulation variable. Realisations that do not fall between this limit, will be discarded. If you are using Gaussian units, then negative values should be allowed. If you are using non-negative grades, then negative values should be discarded.
Simulation Selection
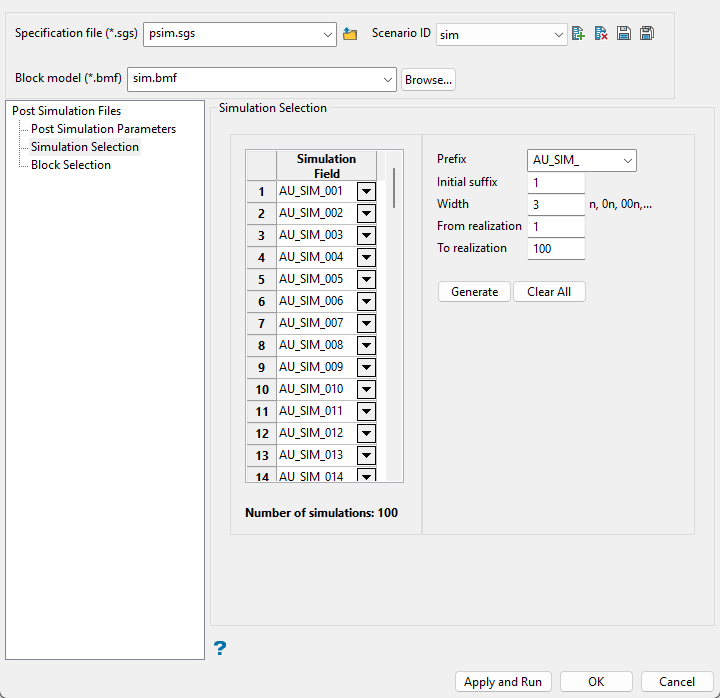
Use this pane to select the variable that will be used to store each one of the realisations. In addition, an automatic tool can be used to create the necessary variables.
Follow these steps:
-
Enter the Prefix for the variable name. You can use one from the drop-down list or enter your own.
-
Enter the starting number in the sequence in the Initial suffix field.
-
Enter the minimum number of characters that can be used to represent a number in the Width field.
Example: A prefix of
simwith an initial suffix of 1 and a width of 3 would result insim001as the first simulation field. -
Specify an initial and final realisation in the From realisation and To realization fields. These values are only used to calculate the number of realisations.
-
Use the Generate button to populate the Simulation Field list. This is a list of variable names that will hold the results of the individual realisation runs.
Click the Clear All button to remove all entries and delete the current list.
Note: Clearing the list does not delete existing variables from the block model.
Block Selection
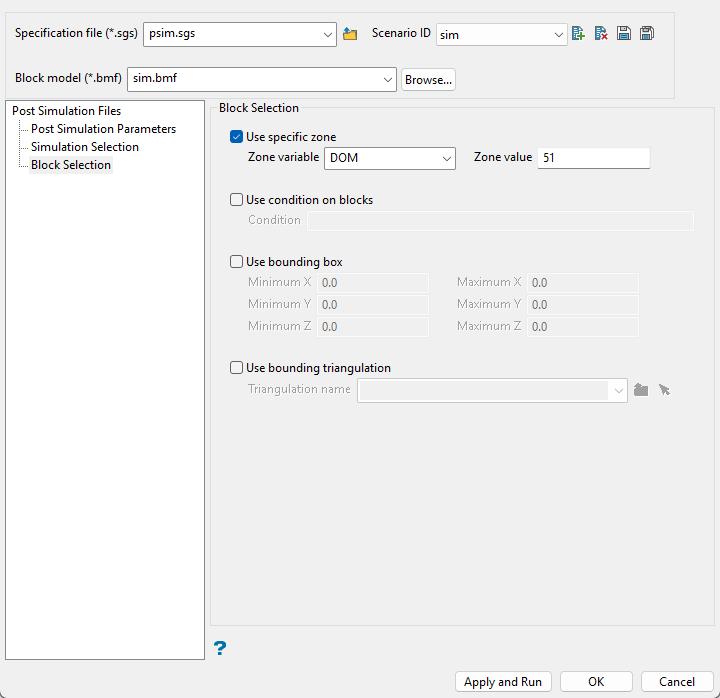
Use this panel to set up various block selection options. Select any of the options to limit the blocks used.
Select this checkbox to limit the estimation to those blocks where a specified variable equals a certain value. Both the variable and the value are forced to be lowercase.
Select this checkbox if you only want to apply a condition to the blocks to be estimated. A single condition can contain up to 132 alphanumeric characters. For a condition to contain more than 132 alphanumeric characters, you will need to manually edit the (.bef) file. Refer to Appendix B of the Vulcan Core documentation for a list of available operators/functions.
Select this checkbox to restrict the estimation to those blocks whose centroids lie within a specified range of co-ordinates. Enter the minimum and maximum co-ordinates (in the X,Y and Z directions). These co-ordinates are offsets from the origin of the block model (that is, block model co-ordinates).
Select this checkbox to limit the estimation to those blocks that lie within a specific solid triangulation. The triangulation name can either be manually entered or selected from the drop-down list. Click Browse to select a file from another location. You can also select loaded triangulations from the screen by clicking the Pick Screen option.
Click Apply and Run to begin the simulation. This will save your settings in to the specification file and start the simulation run.
Click OK to save your settings to the specification file without running the simulation.
Click Cancel to close the panel without saving any settings.
