Annotate String Z Value
Annotate 3D Strings with their Z Values
Use the Annotate String Z Value option to annotate 3D strings with their Z values.
The main difference between labels and annotations is that annotations are considered to be text objects and can therefore be printed, whereas labels can only be printed if they are first put into a layer. Refer to the Point Label to Text and Object Label to Text options for information on how to place labels in a Vulcan layer.
Instructions
On the Analyse menu, point to Label, and then click Annotate String Z Value.
The Multiple Selection box is displayed for you to choose a selection method and select the strings.
The String Annotate panel is then displayed.
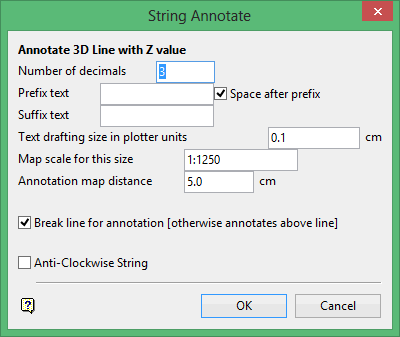
Number of decimals
Enter the number of decimal places for the annotation. The maximum number of decimal places allowed in a single label is 6. The default number of decimal places is derived from the Miscellaneous section of the Tools > Preferences option.
Prefix/Suffix text
Enter optional suffix and/or prefix text. The maximum size is 10 alphanumeric characters.
Space after prefix
Select this check box to insert a space between the prefix and the annotation.
Text drafting size in plotter units
Enter, in plotter units, the size of the text. Annotations lie in a straight line, that is, the text does not curve. The font used for the annotations is set through the Defaults : 2D Text section of the Tools > Preferences option.
Map scale for this size
Enter the scale for the text size. This value along with the drafting size will determine the size of the text on the screen.
If the text size is set to '0.10' (10 cm), and the drafting scale to '1:1250', then the text will appear on the screen the same size as an object that is 125 units long. Changing the scale, through either this option or the File > Plot > Plot All option to '1:1000' will result in the text appearing the same size as an object that is 100 units long. Changing the scale to '1:1' 000' results in a text size of 1000 and so forth.
Fixed fonts appear on the screen the same size regardless of the map scale.
Annotation map distance
Enter, in plotter units, the distance between the annotations on the string. This value along with the map scale will determine the placement of the annotations on the screen. Refer to Map Scale for this size option for more information.
Break line for annotation
Select this check box to annotate in the line. If this check box is not checked, then the annotations will appear above the line (as shown in Diagram 1).
Anti-Clockwise String
Select this check box if the strings have been digitised anticlockwise. This will ensure that the annotations are printed the right way up. If this check box is not checked, and the strings were digitised anticlockwise, then the annotations will appear upside down.
Click OK.
The Z values of the selected objects are then displayed at the nominated distance.
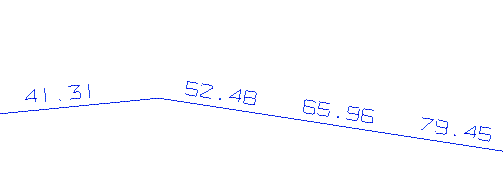
Figure 1: Annotating with Z values
Use the Delete option (under the Design > Object Edit submenu) or the Delete option (under the Design > Text Edit submenu) to remove the annotations.
