Export ASCII
Use this option to export block model values as an ASCII file.
Instructions
On the Block menu, point to Transfer, then click Export ASCII.
![]()
Follow these steps:
-
Select a Specification file from the drop-down list, or enter the name of a new one.
Note: You do not need to include the file extension when creating a new specification file. An extension of (*.bexp.spec) will be added automatically when you click OK to run the export.
-
Select the Block model name from the drop-down list, or click the Browse button to locate the model if it is not in the top level of the working directory.
-
Enter the Export file name. You do not need to include a file extension. An extension of (*.asc) will be added automatically when the option is run.
Important: It is possible to select an export file name from the drop-down list, or click the Browse button to locate the model if it is not in the top level of the working directory. However, any existing file using the same name will be overwritten.
-
Select whether or not you want to include a column Header in the finished results. If this option is selected, a column header will be added to each column in the report.
-
Select any optional Built-in Variables to Export. These are the built-in system block variables.
Note: The option Export the block corner offsets is only applicable to Harp models and will be disabled unless a Harp model (smooth block model) has been selected.
Export the block ID
The block number, an integer value.
Export the block centroid
The centre of gravity of the block, around which the lengths are used to define it.
Export the block lengths (x, y, z lengths)
The block lengths of the original block size.
Export the block extents (x, y, z lower and upper)
May not reflect the design lengths when partial blocks are listed; defines volume.
Export the block volume
The enclosed volume of the block or partial block (reflects extents).
Export the block corner offsets (4 bottom and 4 top - Harp only)
The lower and upper corner offsets of a Harp block (normal block has flat ends).
-
Set the Built-in Variables Formatting by selecting the Separation character. The options include a comma, tab, or space.
-
Set the Column Layout. This section controls how the built-in variables selected above will appear in the report. The width and precision will be applied to all columns of built-in variables except for the block ID which will use the width only. The minimum allowed width is 10 characters.
-
Select which Centroid Values you want to use. Centroids may be reported as real-world coordinates in the mapping space of the mine site, or they may be reported as relative offsets to the origin of the block model. Real world is the default.
When reporting the centroids of partial blocks (only applicable when certain Block Selection criteria are applied -- see Block Selection), the choice is to use the original block centre of the block from which the partial volume is a part, or alternatively to report the centre of the proportional extent which is defining the partial block volume.
User Variables and Formats
![]()
Follow these steps:
-
Select either Export all user variables or Export a selection of the user variables.
Selecting Export a selection of the user variables will enable you to use the Block Model Variable Selection table.
To highlight multiple files that are adjacent to each other in the list, hold down the Shift key and click the first and last file names in that section of the list.
To highlight multiple non-adjacent files, hold down the Ctrl key while you click the file names.
Note: To export just the built-in variables and no user variables, select Export a selection of the user variables, but do not select any variables in the Selected Block Model Variables list on the right.
Move the items to the selection list on the right side of the panel.
- Click the
 button to move the highlighted items to the selection list on the right.
 - Click the
 button to remove the highlighted items from the selection list on the right.
 - Click the
 button to move all items to the selection list on the right.
 - Click the
 button to remove all items from the selection list on the right.
- Click the
-
Determine how variables columns will be formatted in the export report.
The easiest way to format the data is to provide a default width and default numeric precision in the Default Column Layout sub-section.

If nothing else is selected in the next sub-section, these values will then be applied to ALL of the user variables which are exported. However, precision will not be applied to text strings.
Note: The default width may not be less than 10 characters (for field widths with less than 10 characters, see the next section).
-
Set any Custom Column Layout preferences. This is used to allow for any desired column width and/or precision to be specified for each variable exported.

If only default column layout settings are in force, the summary window in this sub-section will read Default - as in the example above - showing that all variables selected in the Selected Block Model Variables list, or all variables if the Export all user variables radio-button is active, will be output in the default format specified in the sub-section above.
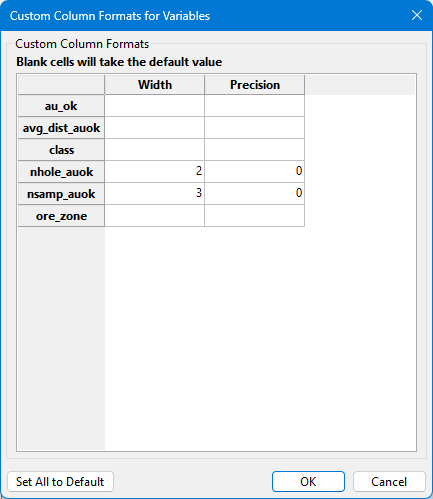
If custom formats are wanted for all or only some of the variables selected, click Set Formats to display the Custom Column Formats for Variables panel. This panel displays all the variables which match the required selection settings in the User Variables to Export section, as described above ( User Variables to Export ).
Fill in only those fields in which you want to replace the default values.
Note: If you want to restore all settings to the default value, click Set All to Default.
With the settings shown in the screenshot above:
- Variable nhole_auok will have the custom width of 2 characters with custom no decimal places.
- Variable nsamp_auok will retain the default width of 3 characters with custom no decimal places.
- The remaining variables will retain both the default width of 12 characters and default 6 decimal places.
Note: If you do not want any decimals, you must specify 0 (zero) precision. If you leave a field blank, it will use the default value. This applies for both width and precision.
Block Selection
Use this section to limit the selection of blocks to export from the block model.
By default, all blocks from the model will be selected for export. However, it is possible to apply a number of selection criteria to limit the blocks which will be exported to the report.
![]()
Use this pane to set up various block selection options.
-
Select either All blocks if you do not want to limit the blocks used, or Specific blocks to selects specific blocks based on selected criteria.
 Mask by Variable
You will need to specify the variable, as well as a particular value.
Example: If you have a variable called
Materialin your block model and want to restrict blocks to those where the material equals ore, selectMaterialas the variable and enteroreas the value. However, if you require all blocks that do not have this specified value, then enable the Reverse selection check box towards the bottom of the panel.Use test condition
You can limit the blocks by adding a condition on a numeric block model variable.
Example: To select blocks where iron has a value greater than 10.0, the condition would be
Fe GT 10.0The maximum size of the condition is 256 alphanumeric characters. Refer to Appendix B of the Core Appendices for a full list of available operators and functions.
Use bounding triangulation
This is useful when you want to evaluate reserves in a particular solid triangulation, such as a stope.
Select the triangulation from the drop-down list. or click the Browse icon to select one from a location other than the top level of your current working directory.
Tip: To use all blocks outside of the selected triangulation, select the Reverse selection option in addition to the bounding triangulation.
Use bounding surfaces
Use this to restrict blocks to those that lie between two limiting surfaces.
Select the Upper triangulation and Lower triangulation from the drop-down lists, or click Browse to select a triangulation from a location other than your current working directory. Only blocks that lie in the overlapping sections of the surfaces, as viewed in plan view, are selected.
Use bounding box.
If you select this option, you must enter the minimum and maximum coordinates for X, Y, and Z in the block model coordinates (X, Y, Z CENTRE). If the block model origin is set at 0,0,0, then real world coordinates should be entered in the X, Y, and Z minimum and maximum coordinates. If the block model origin is set at real world coordinates, then enter coordinates for the bounding box that are offset a certain distance from the origin. The distance of offset will be determined by the dimensions of your bounding box. It will be the distance to the minimum and the distance to the maximum X, Y, and Z from the origin of the block model.
Use Section
This will restrict the blocks by a projection plane. You will need to enter its associated thickness. The blocks that are within that thickness will be selected.
The section plane can be selected by line, points, or grid coordinates. This information is entered through the Projection Plane panel, which displays upon clicking Define section.
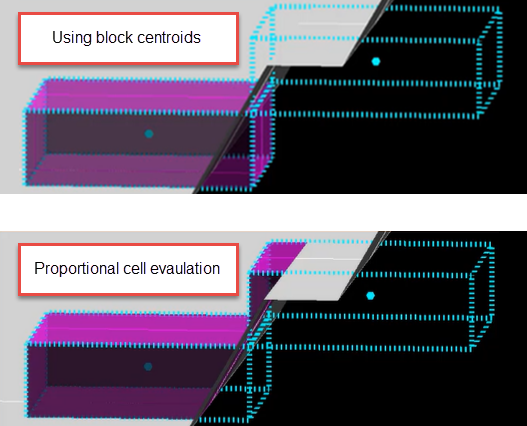
Use block centroids or Proportional cell evaluation
Decide whether you want to use the entire block or only the portion that is within the regional boundaries. This is especially important when using options such as Bounding triangulation, Bounding box, Section thickness, or Bounding surfaces.
 Reverse selection
Select this to exclude the selected blocks. This option works in combination with the other options on the panel.
Example: If you set up Mask by variable to select all blocks that have a gold grade of (-99.0), then selecting Reverse selection will prevent any block with a gold grade of (-99.0) from being used.
Example: Or as another example, if you set up a bounding box to limit Z values between 2300m and 5500m, selecting Reverse selection will prevent blocks with Z values between those elevations from being used.
-
Click OK to run the option. Click Cancel to exit without saving.
