View Point Walk
View the Scene by 'Walking' Along Paths
Use the View Point Walk option to select the points to look at while 'walking' along nominated lines (paths). You can switch between the view points during the walk.
The lines may be part of the displayed data or may be a temporary lines created especially to set the walking paths.
If you are going to create temporary lines, then these lines need to be created prior to starting this option.
The mouse and Hotkeys, outlined below, apply to the Walk, Look, Flyby, and Iroad > View > Drive options and the Look from Point ![]() and Flying Viewpoint
and Flying Viewpoint ![]() icons on the Look toolbar.
icons on the Look toolbar.
|
Mouse and Hotkeys |
Action |
|---|---|
| Left | Controls throttle. Hold the left mouse button down and move the mouse up and down to control the velocity. |
| Click | Starts the autopilot, the current heading will be maintained until you click again. This can be quite useful as you can avoid losing control when you click on an icon on the toolbar. |
| Middle | Controls altitude. Hold the middle mouse button down and move the mouse up and down to change the altitude. |
| [ | Increase altitude. This is equivalent to holding down the Middle mouse button and moving the mouse upwards. |
| ] | Decrease altitude. This is equivalent to holding down the Middle mouse button and moving the mouse downwards. |
| Right | Controls banking. Hold the right mouse button down and move the mouse side to side to control the roll. To "trim" the aircraft, right-click and release. |
| Middle and Right | Allows you to zoom in and out. |
| Middle and Left | Allows you to pan. |
| Left Arrow | Look left. |
| Right Arrow | Look right. |
| Forward Arrow | Look forwards. |
| Back Arrow | Look backwards. |
| J | Leave and later rejoin the nominated flight path while in Fly mode. |
| Shift + A | Toggle screen annotations and throttle display On/Off. This is the same as selecting the Toggle Annotations |
Moving the mouse up and down controls the pitch.
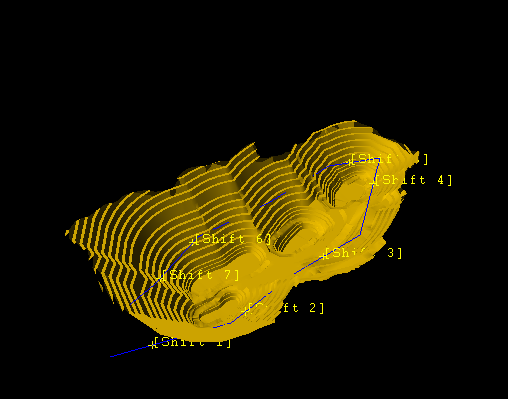
Figure 1: View Points
The main difference between the View Point Walk option and the Walk option is that the latter allows walking along paths only and no points can be selected.
Instructions
On the View menu, point to Change View, and then click View Point Walk.
Select the points at which to look. Up to nine points can be selected, these points do not have to be on the line. In fact for best results you should select points close to but not on the line. Cancel when you have finished selecting points. Your points displays on the screen in the format Shift + n where n is an increasing integer between one and nine. You can select any number of points, including zero.
Select the path(s) to walk. Right click when you have selected the path(s), or select a start point along a path. This will begin following the defined path. If you would like to make the path to follow invisible, select the path as you would normally, but rather than right clicking, use the Make Objects Invisible button (dark gray sphere) on the toolbar. Click the path line to hide it, then right click once to cancel the visibility mode. To enter the walk mode, pick one of the points on screen that was formerly part of the line.
The walk then follows the direction of the nominated lines.
The following over-head display (known as the "throttle display") ![]() is shown, and to control the velocity at which to view displayed data through the use of the mouse.
is shown, and to control the velocity at which to view displayed data through the use of the mouse.
Figure 2: Throttle Display
Click and move the mouse either forwards or backwards depending on the direction at which you want to view the data. The further the mouse is moved over the throttle display, up or down, the greater the velocity and hence the data will be viewed at a faster rate.
While walking along the paths, you can press Shift and a number key to look at the specified points. Shift + 1 looks at the first point, Shift + 2 looks at the second point and so on. Once these view points have been established, you can look at these points in any of the other fly modes. For instance if you use J to move above or below the path, you can still use Shift + 1 to look at the first point.
Use the Esc key to exit the option.
