Annotate
Annotate Structural Data
The Annotate option to label structural data in either the Primary or Stereonets Window.
![]() Note
Note
Only geotechnical data that has been loaded as a structural object can be annotated. Halos, plane lines or points are not supported.
Instructions
- Select Geotech menu
- Select Analysis submenu
- Select Annotate option
The following panel displays.
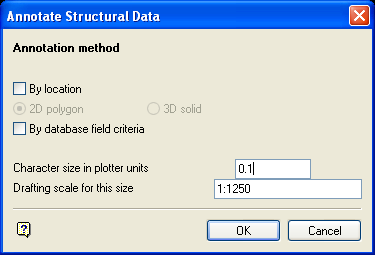
Annotate Structural Data panel
Annotation method
Structural data can be annotated by location and/or by database field criteria.
By location
Select this check box to annotate by 2D polygon or 3D solid. The data to be annotated will be limited to a nominated polygon or triangulation respectively. When this checkbox is ticked, you will need to specify whether to annotate by 2D polygon (the default) or 3D solid.
Annotating by 2D polygon allows you to select a polygon in the current window (Primary or Stereonet) and limit the selection of structural data to in that polygon. Annotating by 3D solid allows you to select a solid triangulation in the Primary Window and limit the selection of structural data to in that solid triangulation.
By database field criteria
Select this check box to specify criteria for the value of any fields in the database; the criteria must be met if the structural data is to be selected for annotating.
The Selection Criteria panel displays once the Annotate Structural Data panel has been completed. The Selection Criteria panel will list all of the available fields in the structural database. You can then specify the values to be met for any of these fields in order to be annotated. If this checkbox is not ticked, then the Limited Selection Criteria panel displays. This panel allows you to specify selection criteria for a subset of the fields only.
Character size in plotter units
Enter the size of the text on the plot in relation to the drafting scale.
Drafting scale for this size
The drafting scale is used in conjunction with the text size entered above.
For example, if the text size is set to 0.30 and the drafting scale to 1:100, then text will appear on the screen as 0.03cm. Changing the scale in either this option or the Plot option (under the Geotech > Utilities submenu) to 1:1000, results in the text appearing as 0.30cm. Changing the scale to 1: 10 000 results in a text size of 3cm and so forth.
Select OK.
One of two panels will now display. If the By database field criteria checkbox was ticked, the Selection Criteria Entry panel displays. If it was not ticked, the Limited Selection Criteria panel displays. Refer to the Highlight option for descriptions on both of these panels.
Once the panels have been completed, the following panel displays.
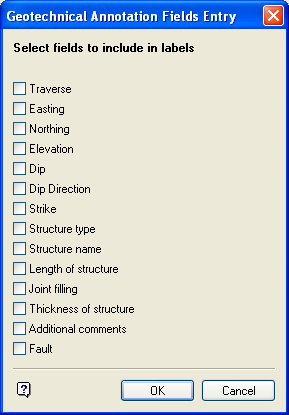
Geotechnical Annotation Fields Entry panel
This panel lists all the fields in the structural database. Check the appropriate boxes for the fields you want include in the structural annotations.
Select OK.
Select a colour for the annotations. Once a colour has been chosen, the annotating process is started. Press the [Esc] key to cancel the process.
![]() Note
Note
The annotations, which are created as text objects, can be plotted. They may be removed from either the Primary or Stereonets Windows through using the appropriate options under the Geotech > Display submenu.
