Generate Models from Standardised Tables
Use this option to generate washability models once the standard database is successfully generated. With the modelling option, it is considered that the specifications are likely to be more dynamic than used with the standardisation of data.
The modelling process (also the Standard Vulcan Modelling Paradigm) comprises of extracting from the standard database relevant wash table data for the intercepts of the defined horizons. This data is written to the mapfiles from which standard Vulcan models are built. Therefore, the model specifications are divided into four categories, each of which needs to be completed.
Instructions
On the Washability menu, click Generate Model from Standardised Tables to display the following panel.
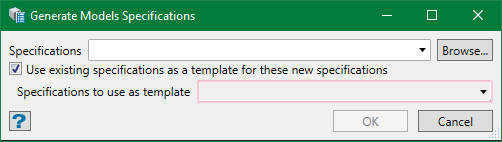
Select the specification file to be edited from the drop-down list or browse from another directory. By default, it is pre-populated with the last specification edited or set up. These files can also be found and manipulated from Specifications > Washability Specifications > Generate Models Specification in the Explorer.
You can also create a new table either by entering a new unique name or leaving the field empty. This enables the option to use an existing specification as template. Select this option and choose an existing specification from the drop-down list to be used as a template for the new one.
Note: If you leave the specifications name empty, you will be prompted for one when saving the settings in the next panel.
Click OK and the Generate Models Specifications panel is displayed. If a specification file is selected, the panel is automatically populated with the data from the file or else the panel is blank.
Databases
Use this option to select the standard washability database generated from Standardise Tablesfrom which the wash table data are extracted.
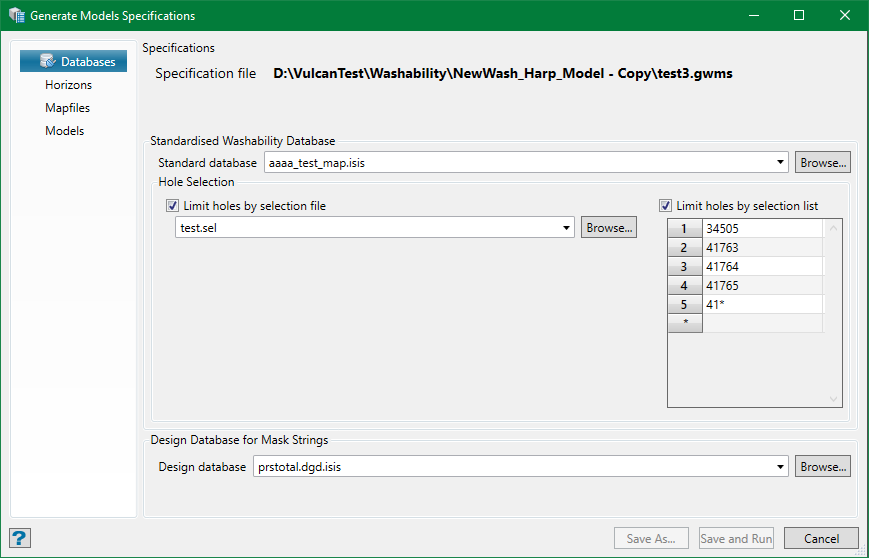
This name of the specification file being used/edited is displayed at the top in bold. For new unnamed or as yet unsaved specs, this will read as <New Specifications>.
Standard database is the only required field in this option, which can be selected from the drop-down list or browsed to. By default, the wash data from all the holes in the specified database is used. However, if required, this can be limited by using a selection file and/or a selection list for which standard Vulcan wildcard may be used.
The design database name will only be required if polygon masking is to be used in the wash data models for any of the horizon. In this case, all the polygon strings must be available in one database.
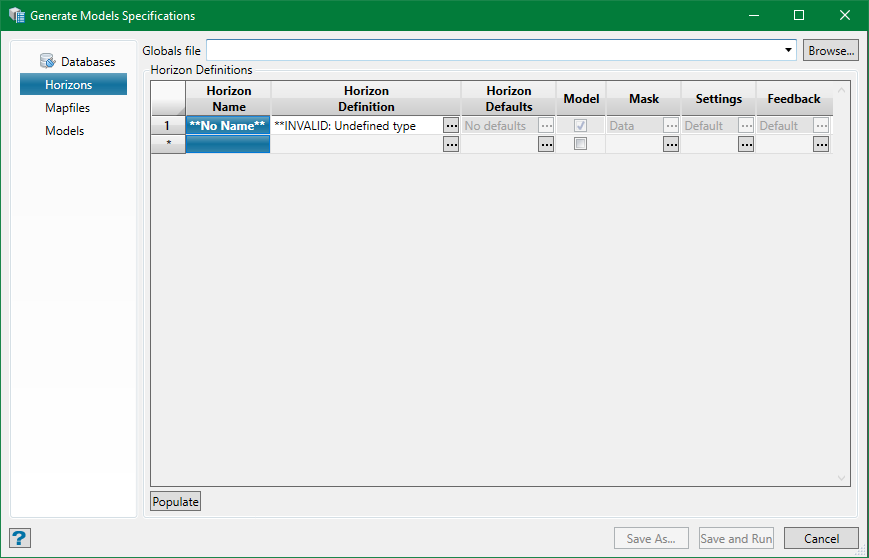
Horizons
Use this option to create intercepts of the defined horizons in the extracted wash table.
Globals File
The seams name specified in the Grid Calc system 'globals' file ( .glob) will be used to populate the drop-down lists throughout this panel for horizon definition. If there is no gob file specified, the default file for the current project will be used ( <proj>.gdc.glob). However, the fields using the seam name drop-down lists also allow non-listed names to be used when required.
If the standardised database contains unique seam names, you may want to create a glob file specifically for that database. The glob file can be made using the option in that utility, which allows for the names to be extracted from the database. This customises the drop-down lists for the horizon in the standardised database.
Note: When defining horizons, the horizon/seam name can be typed directly and not necessarily be selected from the drop-down list.
Populate
If the default glob file is available or a custom one has been selected, the horizon definitions may be auto-populated using all the seam names contained therein, by pressing the Populate button. They will be defined as Single Horizon Type horizons each using all of the intercepts for the nominated seam.
Horizon Definitions
The horizons definitions data-grid contains the setup for each horizon to be modelled—one per line. The horizon can be a simple geological horizon (eg. a seam) or a composite of seams, depths, and so on to form a working section.
Rows can be added to the data grid in a usual way—right-click context menu or simply click on a field in the empty bottom row. A new row will appear with the values unassigned or disabled until you define them.
Horizon Name
This is the name by which both the mapfile and model file names will identify the horizon. It must be unique. While the panel allows for lowercase characters, the names are not case-sensitive. The name does not necessarily have to be the same as, for instance, the seam it represents. It can be arbitrary.
An empty row will be flagged as **No Name**and you might have to name it here. Because if the Horizon Definition has been set up and the name is still empty, a name based on the definition settings will be assigned.
Horizon Definition
This field allows to select a definition of the horizon from a list of definitions. Click on the field and the Horizon Definition panel shows up.
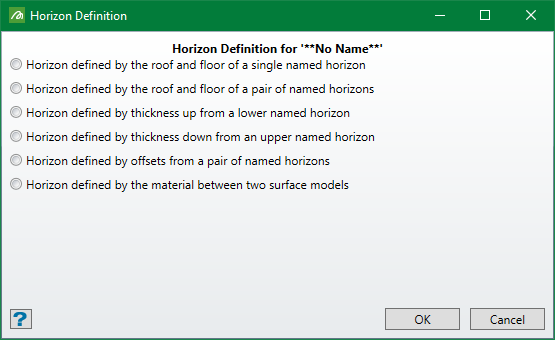
An undefined horizon will have all the options unselected. Select a definition and the required fields for that definition appear.
Single Horizon Type
All of the available intercepts will be used for the chosen seam to create a composite wash table for each hole.

Enter the name of horizon (seam) and ply (if required). The ply field will be present only if the source database setup for making the standardised database had a ply defined. Press OK and you will see that the horizon with 'No Name' has been named automatically.

Horizon Pair Type
All of the available intercepts between the bottom of the lower seam and the top of the upper seam will be selected to create a composite wash table for each hole.

Thickness from Lower Type
All or part of the available intercepts between the bottom of the seam (+/- offset) and up to the required thickness will be selected to create a composite wash table for each hole.

If the offset is zero, the thickness will start form the base of the nominated seam. If the offset is positive, the thickness will start from that distance above the base and if negative, that distance below the base.
Thickness from Upper Type
All or part of the available intercepts between the top of the seam (+/- offset) and up to the required thickness will be selected to create a composite wash table for each hole.
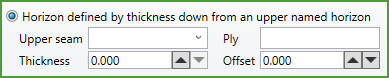
If the offset is zero, the thickness will start form the top of the nominated seam. If the offset is positive, the thickness will start from that distance below the top and if negative, that distance above the top.
Horizon Pair Offset Type
This is similar to the Horizon Pair Type but allowing more control for offsets above and below and for thickness.
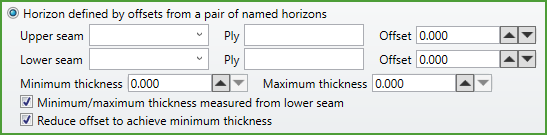
Offset for upper seam is similar to the Thickness from Upper Type and offset for lower seam is similar to the Thickness from Lower Type. Control the thickness by limiting the minimum and maximum values; leave them zero for no limits. Use the first checkbox to measure the limited thickness from either upper or lower seam—check for the lower seam and uncheck for the upper seam. Similarly, the second checkbox can be used to reduce the offset values to maintain the thickness—eg. to keep as much of the material within the seam to give the required minimum.
Horizon Models Type
All or part of the available intercepts between the upper model (+/- offset) and the lower model (+/- offset) will be selected to create a composite wash table for each hole.
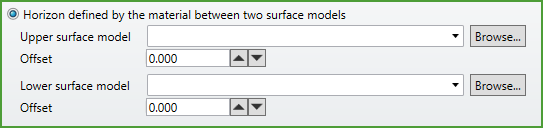
Offset from upper surface model is similar to Thickness from Upper Type and offset from lower surface model is similar to Thickness from Lower Type.
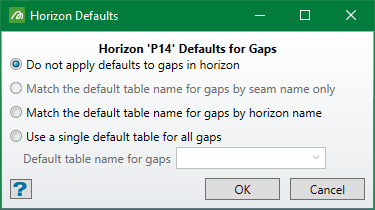
Horizon Default
Like the gaps seen when creating composite wash table for standardisation, it is possible that there can be gaps between the intercepts selected by Horizon Definition also—particularly for the composite types but possibly for single seam horizons as well. This option allows a particular default type to be applied to each horizon separately. Click on the field and a panel appears with list of defaults settings to choose from. By default, Do not apply defaults to gaps in horizon is selected.
Model
A simple checkbox on the data-grid, this option allows a horizon to be temporarily taken out of the processing loop without removing it from the grid. For example, a repeat run in which only some data have been modified and not all models need to be recreated. This can be used for efficiency.
Mask
This option controls how the washability models generated are to be masked for the horizon. By default, it is Data Mask —the convex data-hull shape.

Polygon mask can be used by the chosen object(s) from a layer (see Grid Calc for details on the controls). Alternatively, the models can be unmasked —that is visible over the full extent of the models.
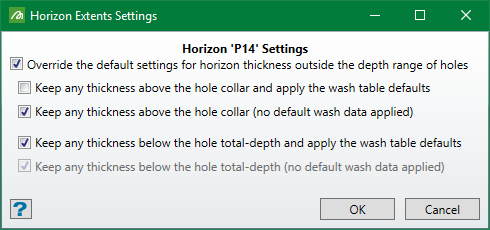
Settings
With the composite horizon definition types which use thickness, it is possible that the range of data selected can extend beyond either end of a drill hole. This can be an issue if default wash tables are to be applied to the gaps which include unlogged data at the ends. This option overrides the default settings for the thickness outside the range of holes. This can be set up in combination with other auxiliary settings provided.
Feedback
This option allows details of the mapfile generation feedback on the washability console to be controlled on a per horizon basis if required.
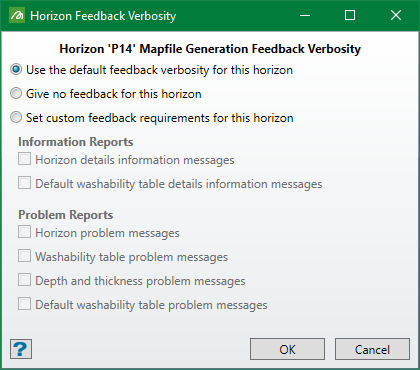
Note: The Default Feedback Verbosity for mapfile generation can be set from the Mapfiles option.
Mapfiles
This option controls the mapfile generation step of the modelling. Use this option to write the data from extracted wash table and defined horizons into mapfiles.
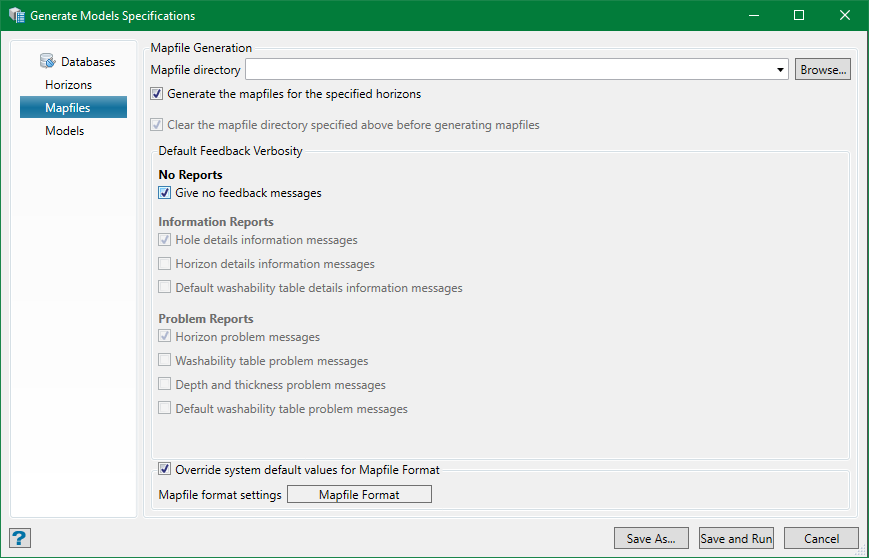
Mapfile Directory
This is a sub-directory of the main project folder (or a separate directory) which stores all the mapfiles generated. It is recommended to use a sub-directory to save clutter in the project directory as it makes file management and audit easier.
Generate the mapfiles for the specified horizons
This options curtails the mapfile generation step if selected—for example, recreating models from existing mapfiles and saving time. But if the mapfiles are missing or incomplete, the modelling step may fail or produced invalid results.
Clear the mapfile directory specified above before generating mapfiles
If a mapfile directory has been nominated, selecting this option clears the content of that directory before generating a new set of mapfiles. This option is disabled if no directory is nominated.
Note: All data files in the directory will be deleted, including sub-directories and not only the mapfiles.
Default Feedback Verbosity
This sets the level of feedback to be generated to the log in the Washability Console during mapfile generation. This may be overridden for individual horizons, if required, by changing the Feedback option of the Horizon Defaults.
Override system default values for Mapfile Format
This provides an option to modify the format of the mapfiles generated, should that become necessary. Selecting this option enables the Mapfile Format button and clicking the button shows up the Mapfile Format Settings panel.
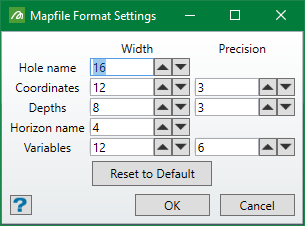
The settings are pretty self-explanatory. It would only be necessary to change these values if, for instance, particularly long names were to be used.
Note: The mapfile contains information about its own structure, so the modelling code can interpret any format given to it.
Models
Use this option to build standard Vulcan models from the mapfiles.
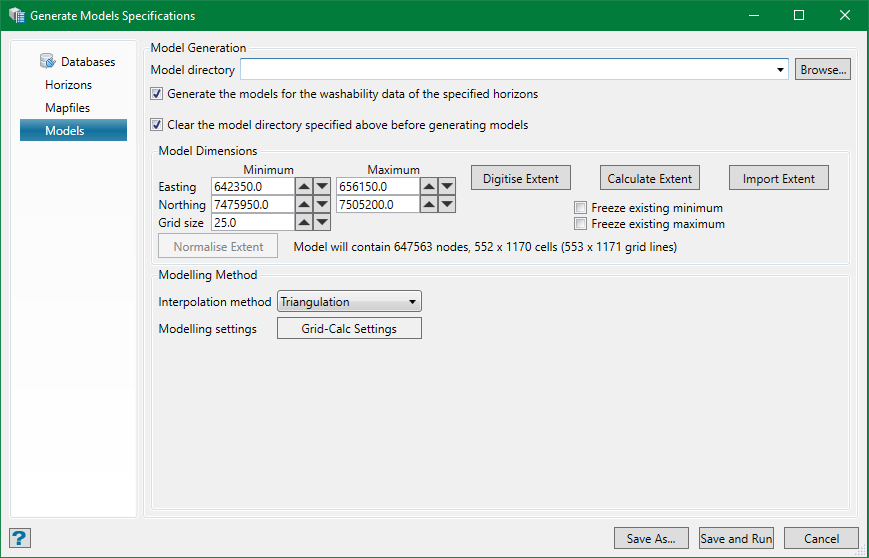
Model Directory
This is a sub-directory of the main project folder (or a separate directory) which stores all the models generated. It is recommended to use a sub-directory to save clutter in the project directory as it makes file management and audit easier.
Note: Horizon models are generated for each density fraction in the standard table. These models being one for yield and one each for variable being modelled. So, if there are 10 horizons, 6 density fractions and 5 variables plus yield to be modelled, there will be 10 x 6 x 6 = 360 model files generated. Having these clutter up the project directory would be very hard to manage.
Generate the models for the washability data of the specified horizons
This options curtails the mapfile generation step if selected—for example, recreating mapfiles and checking and verifying data. The modelling process is fairly lengthy, so there is no need to waste this time if it is not necessary.
Clear the model directory specified above before generating models
If a model directory has been nominated, selecting this option clears the content of that directory before generating a new set of models. This option is disabled if no directory is nominated.
Note: All data files in the directory will be deleted, including sub-directories and not only the models.
Model Dimensions
It is necessary to specify the extent of the area for the models to be generated and grid size to be used. This part of the panel behaves in a similar fashion to the Grid Calc functions in Vulcan. The extent can be typed in manually using the fields, digitised with the Digitise Extent button, calculated from the database data extent with the Calculate Extent button, or imported (along with the grid size) from an existing model with the Import Extent button. When a valid extent is available, it will be highlighted for the duration of the process.
The Normalise Extent button will be enabled only when manually changing extent or grid size fields. The extents must be a multiple of the grid size and the origin must be an integer multiple of the grid size. This will be taken care of by this option. For reference, the model content extent is summarised in terms of nodes and cells.
Modelling Method
It is suggested that the default values of these fields are to be used until you are familiar with their behaviour from Grid Calc.
The available Interpolation methods are Triangulation, Inverse Distance, and Trend. The former two provide the most conservative models while Trend is likely to create artefacts.
The Modelling Settings panel allows further advanced control.
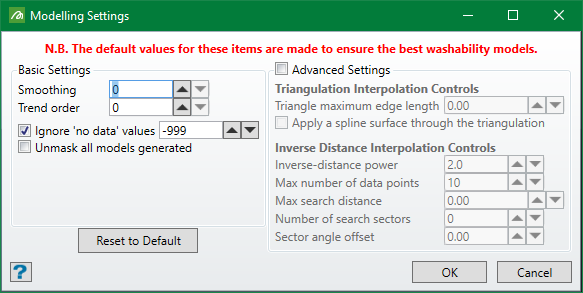
But it is very strongly recommended that these values are left in their default settings—especially using smoothing and/or tending of Triangulated/Inverse Distance models can produce unwanted artefacts, which could render the models unusable.
Save and Run
Click this button to generate the models from standardised tables. The specification file, whether edited or not, will be saved each time the model is run. The file will have an audit time stamp, which has information about the last time the file was used.
The model generation can be a lengthy process. Creating the mapfiles can be quicker than generating models. Meanwhile, a progress bar appears showing the stages of the process. The process can be terminated anytime by pressing the Cancel button.
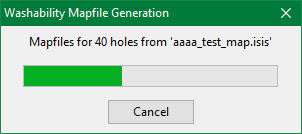
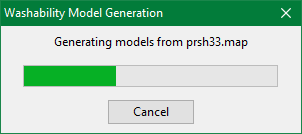
There are two main stages in the process, creating the mapfiles and creating the models.
Throughout the process, the Washability Console will provide details of the information on various operations performed behind. It first samples all the holes for the horizons defined, extracts the required wash tables to produce composite tables, and writes to the appropriate mapfiles.
Once the mapfiles have been created, the models will be generated. As described, a separate grid model is generated for each variable and yield for every density fraction in the standard table for every horizon required. The name structure of these model files is somewhat like this:
<proj><horizon>_<var>_<fraction>.wsg
where <proj>is the current project code, <horizon>is the horizon name, <var>is the variable name, and <fraction>is the density fraction (e.g. F130, F180, S180)
Like standardisation, a detailed log of the process for checking on the results produced is created, which can be controlled as described in the Standardise Tables. The statements are colour coded as black for information, blue for warning and red for error by the workbench system and the log display can be controlled for the displayed messages using the standard console window settings option. The contents can also be printed or stored in a file for future reference.
Note: Unlike standardisation, there should be no warnings or errors with the model generation. They are unacceptable at this stage and will indicate serious issues.
Model Specification Categories
