Tables
Importing tables
Use the Tables option to import CSV or formatted tables (.tbl). These tables can be stored in a new or existing database. In the latter case, if any of the objects have the same name you asked whether you want to replace, keep or merge the object. The table that you want to import does not need to be stored in your current working directory. However, the database (excluding headered databases) in which the imported data will be stored does need to be in your current working directory.
If values are missing (or truncated) from the tables, then the default values will be used. Refer to the File > New Design documentation for more information.
Instructions
On the Utilities menu, point to Import, and then click Tables to display the Database Import panel.
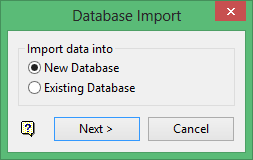
This panel to nominate whether to import the data into a new database or into an existing database.
Click Next.
The prompts and panels displayed depend upon the import method chosen through the Database Import panel.
If you chose the New Database option, then the New Database panel displays.
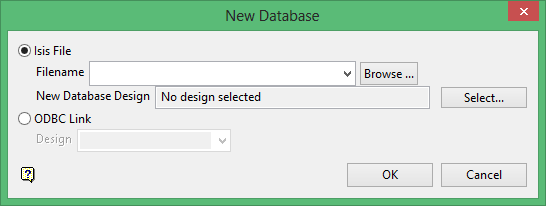
Isis File
Select this option to create an Isis database. Enter the file name, or you can select it from the drop-down list of all files in your working directory or you can browse to a location other than your working directory, in the latter two cases you are asked to confirm the overwriting of this database.
The file may be called anything.
When a new database is created, the format will be as follows: <id>.<dsn>.Isis where <id> is the identifier and <dsn> is the design name. The design name must be three characters. Note that the identifier can be comprised of the project prefix with an optional additional identifier (<id> = <proj><odi>), as was the case in previous versions of Vulcan.
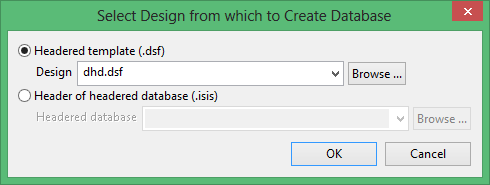
Select the design from which to create the database and then click Select to display the Select Design from which to Create Database panel is displayed.
ODBC Link
Select this option to create an ODBC link database. Enter, or select from the drop-down list, a design.
However, if you selected the Existing database option, then the Select Database panel displays instead.
You can save and then reuse your import specifications. This eliminates the need to complete the panel each time you import a table.
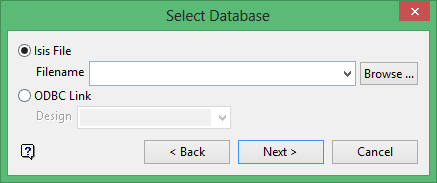
Isis File
Select this option to nominate an Isis database. The available drop-down list displays all Isis database files found within your current working directory. Click Browse to select a file from another location.
ODBC Link
Select this option to nominate an ODBC link database. Select the design name from the drop-down list.
Click Next.
Once selected, the following panel displays.
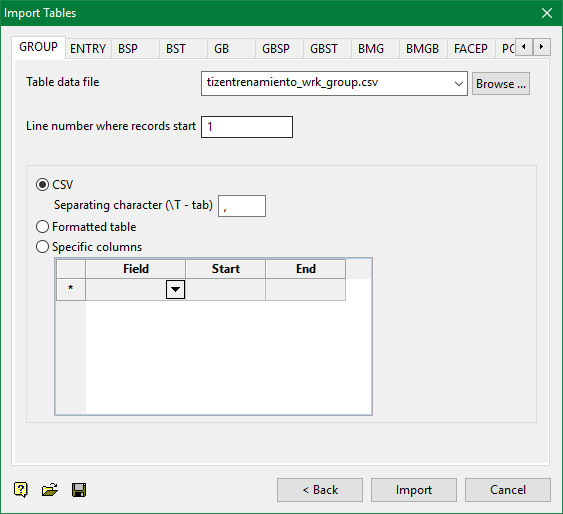
This panel contains tabs for each table that is part of your chosen database. The options on this panel are the same for all of the tables.
Table data file
Specify the name of the table data file. If it is a formatted table, then the file extension is .tbl. If it is a CSV file, then the extension is .csv.
Line number where records start
Enter the line number where the records start, the default is 1.
CSV
Select this option to import a C haracter S eparated V alue (CSV) table. With CSV tables, the individual fields in the records are separated by characters, for example, a comma, or a tab. Refer to the File > Export option for an example a CSV table. Specify the separating character or enter \T to use a tab to separate. The default is a comma (,), however, it may have been the space character, in which case enter a space.
Formatted table
Select this option to import a formatted table. With a formatted table the fields are in columns separated by a space character. Also the file extension of formatted tables is .tbl. Refer to File > Import Export option for an example of a formatted table.
Specific Columns
Select this option to import specific columns from a table. You will need to select the field name from the drop-down list, click in the cell to activate the list, the column number in which the field starts and the column number where the field ends.
Click the Save button ![]() to save your import specifications. In the displayed Save Specifications as panel, enter a name and browse to the directory in which to place the specifications. The file extension for the specifications is
to save your import specifications. In the displayed Save Specifications as panel, enter a name and browse to the directory in which to place the specifications. The file extension for the specifications is iia.
Click the Open button ![]() to open an existing set of specifications. Browse to your specifications and select Open. The panel fields will be populated (filled in) with the values from your specification file.
to open an existing set of specifications. Browse to your specifications and select Open. The panel fields will be populated (filled in) with the values from your specification file.
Click Import to import the table.
The progress of the importing process displays on the screen. To view the imported data, you will need to open the database.
