Thin Solid Mid Surface
Use this option to create a mid-surface triangulation on near-vertical or vertical solids. The resulting surface can be useful for distance evaluation calculations or LVA unfolding when building an anisotropy model.
Instructions
On the Model menu, point to Triangle Solid, then click Thin Solid Mid Surface.

Follow these steps:
-
Use the drop-down list to select the Specification file (
*.sms_spec) if it is in the current working directory, or browse for it in another location by clicking the Browse button. A new file may also be created by typing the name of the new file in the textbox and clicking the New button.-
 Browse
 -
 New
New -
 Save
Save -
 Save as
-
-
Select the triangulations you want use.
Browse button- The Triangulation Selection panel will be displayed.
 Triangulation Selection panel
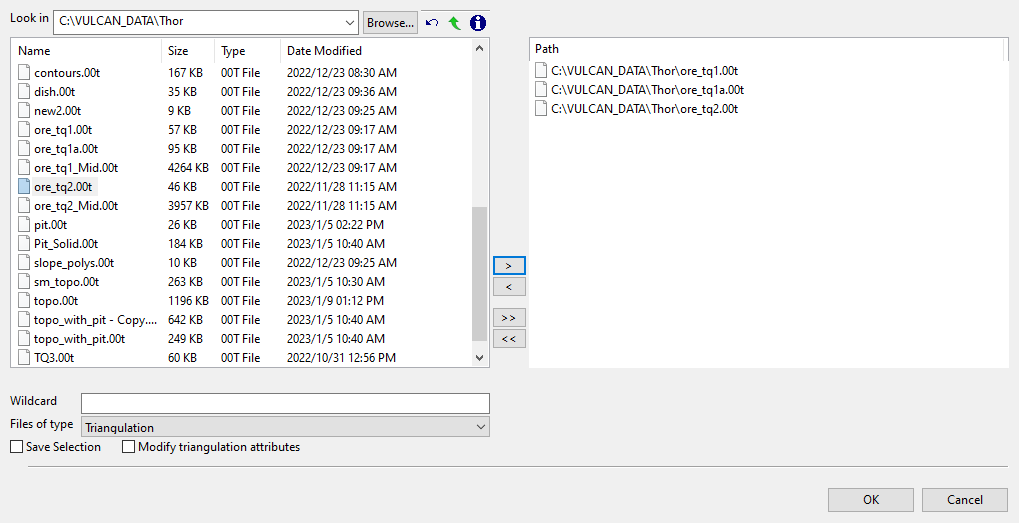
File Selection
Browse for files using the Browse... button, or use the interface showing the available grid files in the current working directory.
Click on the name of the file(s) you want to select. Use the
 icons to go to the last folder visited, go up one level, or change the way details are viewed in the window.
To highlight multiple files that are adjacent to each other in the list, hold down the Shift key and click the first and last file names in that section of the list.
To highlight multiple non-adjacent files, hold down the Ctrl key while you click the file names.
Move the items to the selection list on the right side of the panel.
- Click the
 button to move the highlighted items to the selection list on the right.
 - Click the
 button to remove the highlighted items from the selection list on the right.
 - Click the
 button to move all items to the selection list on the right.
 - Click the
 button to remove all items from the selection list on the right.
Wildcard
Enter the text to use as a filter, then press ENTER.
Use an * for multiple characters or a % to replace a single character.
Save Selection
Select this checkbox to save the selection list (the right-hand side of the Open panel), in a nominated selection file (
.sel). Once this panel has been completed, the Save As panel displays.Select the file that will be used to store the triangulation selection list. To create a new file, enter the file name and file extension.
Modify triangulation attributes
Select this checkbox to modify the current display attributes for the selected triangulation files. This option is recommend if you don't want to use the display settings from a previous Vulcan session. Once this panel has been completed, the Triangulation panel displays. Altering a triangulation's display attributes updates the modification date stamp (date modified).
The Modify triangulation attributes checkbox is not applicable to triangulation files that are currently loaded on screen. Use the Attributes option (under the Model > Triangle Utility submenu) to modify a loaded triangulation's display attributes.
Click OK to return to the main panel.
Screen Pick button- Allows you to select a triangulation that is currently loaded on the screen.
Clear Selected button - Removes all selected triangulations from the list.
Clear All button - Removes all triangulations from the list.
- Click the
-
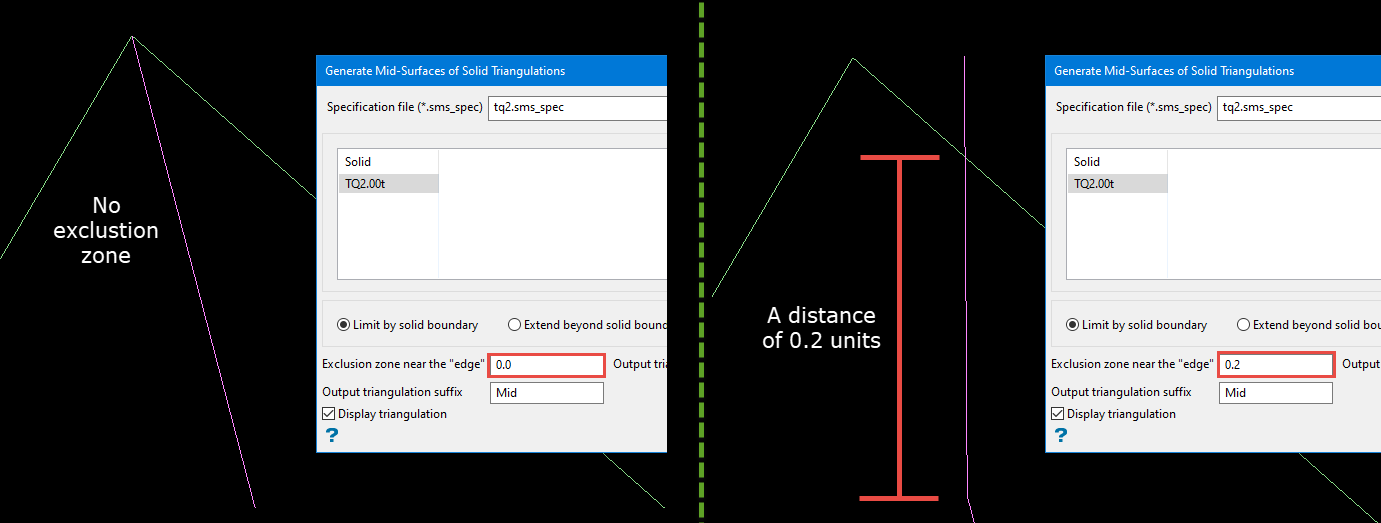
Select Limit by solid boundary if you want to create a mid-surface that is contained within the boundaries of the solid.
-
Select Extend beyond solid boundaries if you want to create a mid-surface that extends the boundaries of the solid.
-
Enter the distance of the Exclusion zone near the "edge". This is the distance from the inside edge of the solid that the mid-surface triangulation will project perfectly vertical.
Note: Larger values will create a smoother result near the edge.
-
Adjust the Output triangulation point density using the slider control.
-
Enter an Output triangulation suffix.
-
Enable Display triangulation if you want the resulting triangulation to be loaded after it is created.
-
Click Apply and Run to complete the operation.
-
Click OK to save the panel inputs without running the option.
-
Click Cancel to close the panel without saving.
