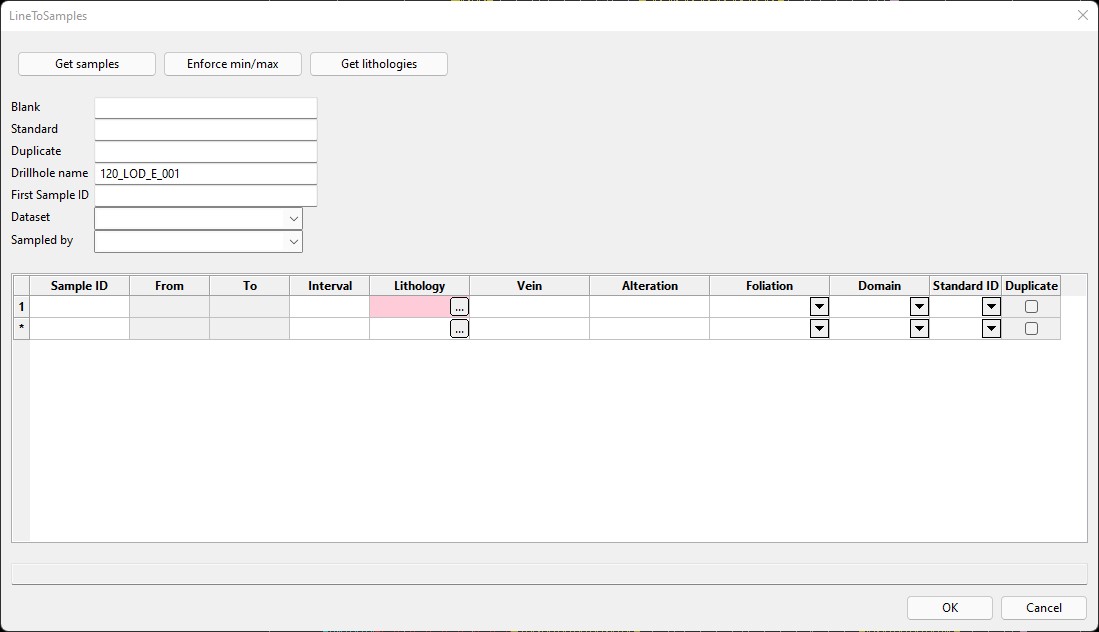
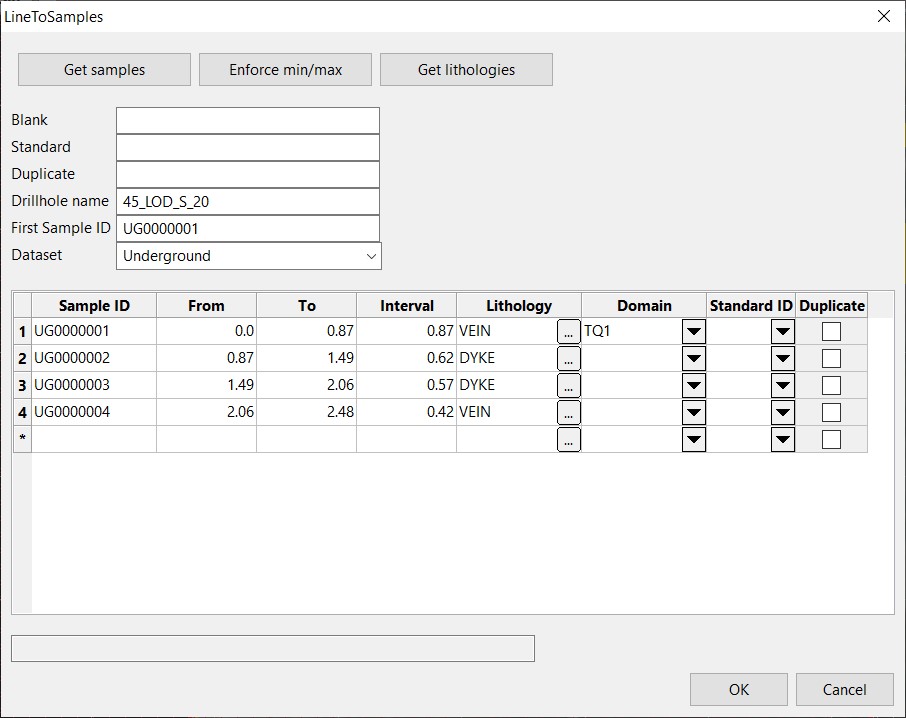
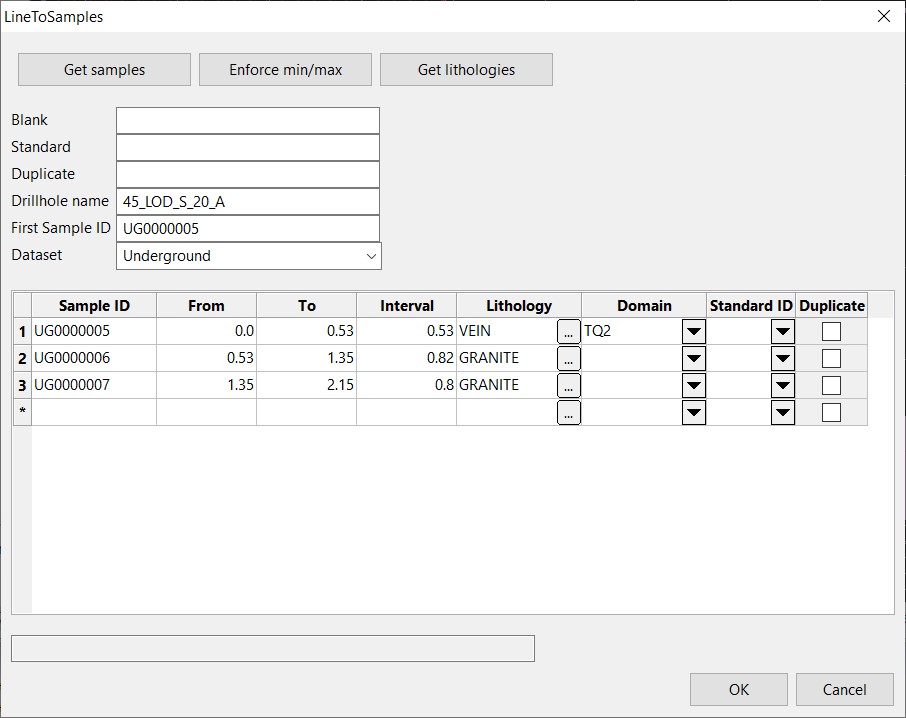
Lines To Samples
Enables the quick and easy digitising of a face sample line and storing of logging and sampling data into a drillhole database.
Instructions
On the Face Mapper menu, point to Mapping, then click Add Station.
Get samples
This button will automatically dill the From, To and Interval cells in the grid based on the points/line digitised. This option works differently, depending on which digitising scenario has been used.
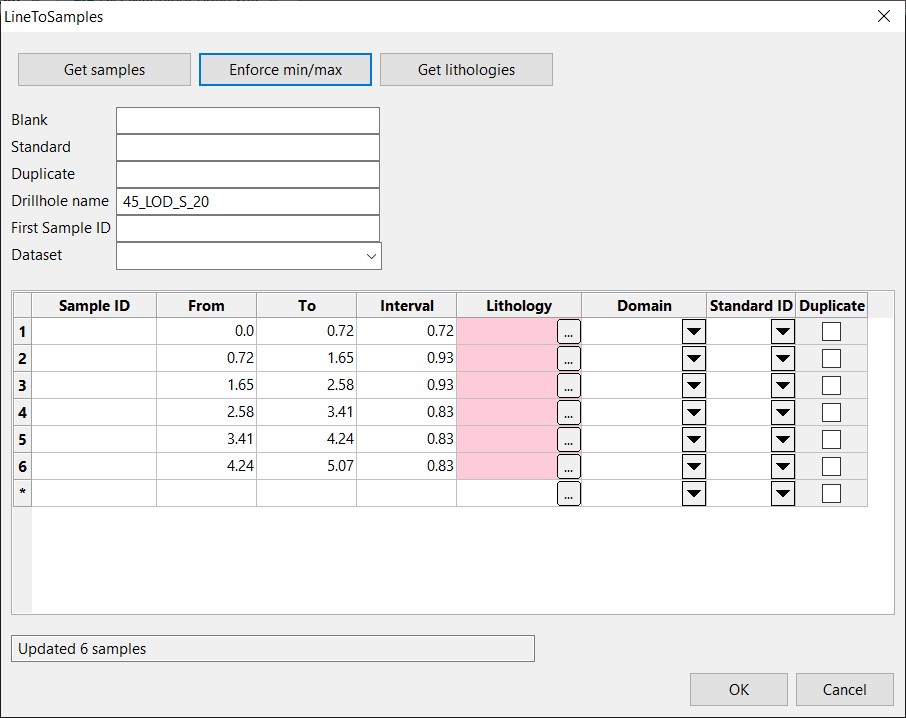
Enforce min/max
This button will automatically split sample intervals to align with the minimum sample interval length and maximum sample interval length defined in the Line To Samples settings.
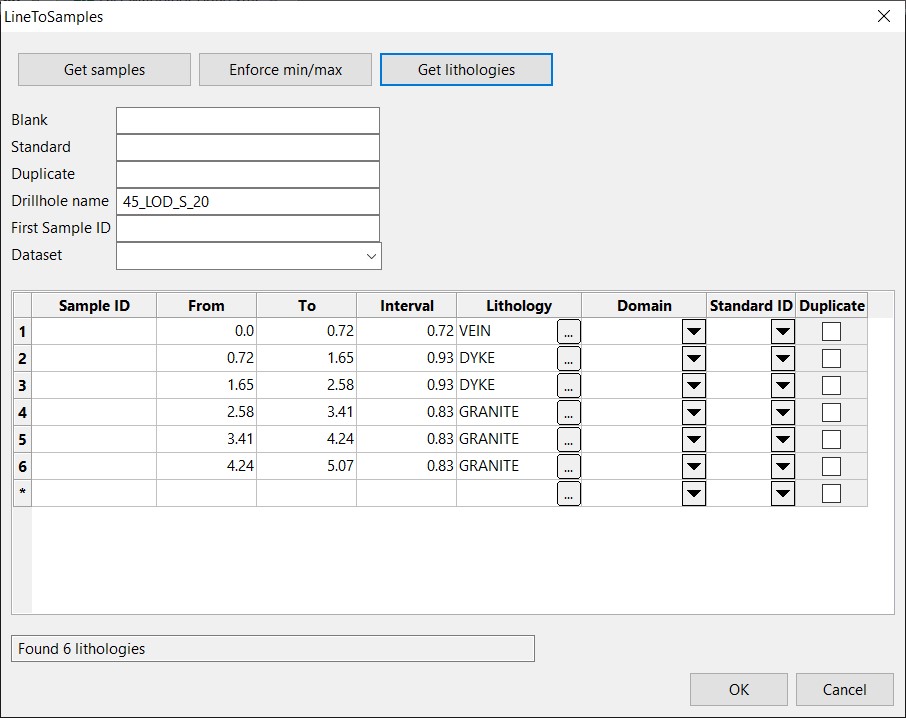
Get lithologies
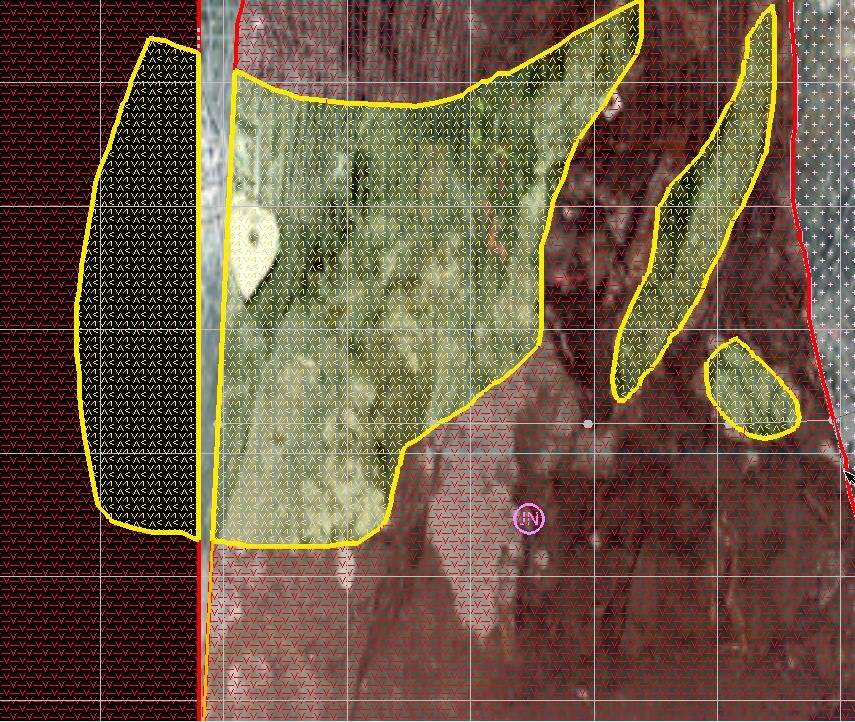
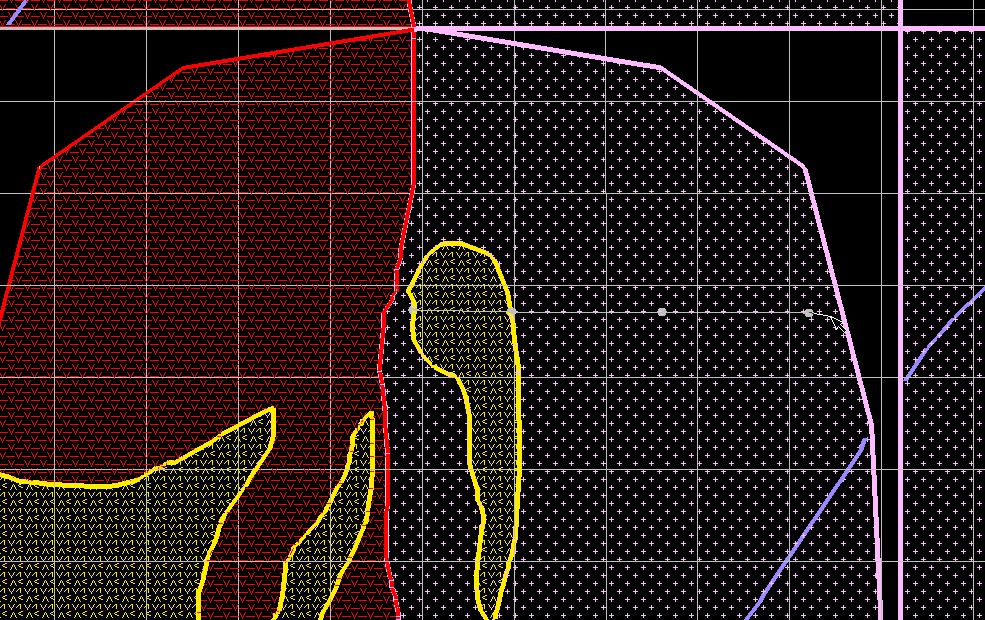
This button will automatically populate the lithology field values based on the defined intervals, if mapping polygons have already been digitised.
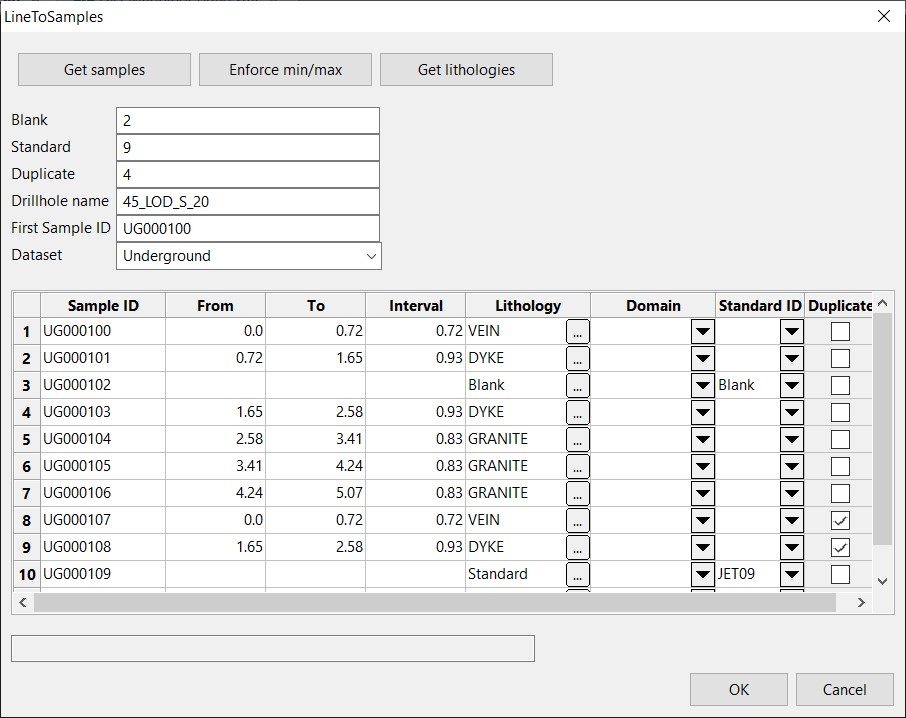
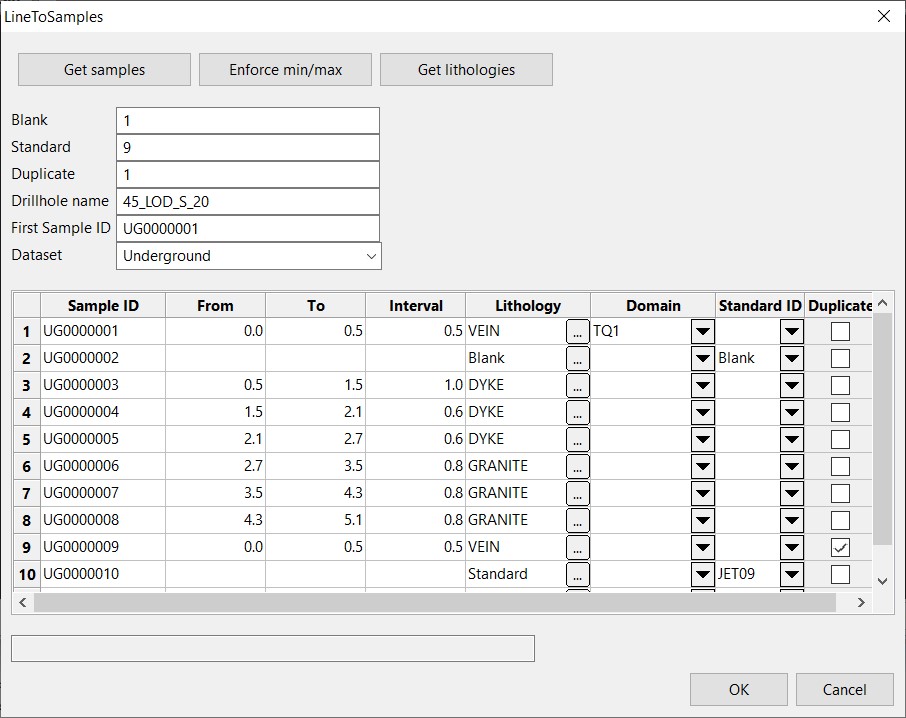
Blank (optional)
The row number of the grid after which to insert a Blank sample. This will be inserted automatically when the cell is clicked out of. Multiple blanks can be inserted (one at a time).
Standard (optional)
The row number of the grid after which to insert a Standard sample. This will be inserted automatically at the bottom of the grid when the cell is clicked out of. Multiple standards can be inserted (one at a time).
Duplicate (optional)
The row of which to create a duplicate sample. This will be inserted automatically at the bottom of the grid when the cell is clicked out of. Multiple duplicates can be inserted (one at a time).
Drillhole name
The drillhole, in this case, will be prefilled with the Face ID (created using a concatenation of the Drive and Face number fields from StationSection – this matches the layer name that was created for the face map). When multiple sample lines are created for the one face a suffix will be applied to the drillhole name, as defined in the 'suffix' parameter in the LineToSamples settings.
First Sample ID (optional)
The first Sample bag number can be input into this cell –this sample ID will automatically be input into row 1 of the grid, with each row automatically increasing the sample ID number by 1.
Dataset (required if enabled)
For some clients using Datashed, a Dataset field is required. This can be enabled in the Samples database > Dataset section of Create Resources. If enabled, this becomes a mandatory field and the desired datasets can be added to the Dataset section of the Configuration settings to populate the drop-down list. If disabled in the Samples database > Dataset section of Create Resources this cell will not appear in the panel.
Sampled by (if enabled)
If ‘Add a Sampled by field’ is enabled in Samples database > Sampled by section of Create Resources this cell will not appear in the panel.
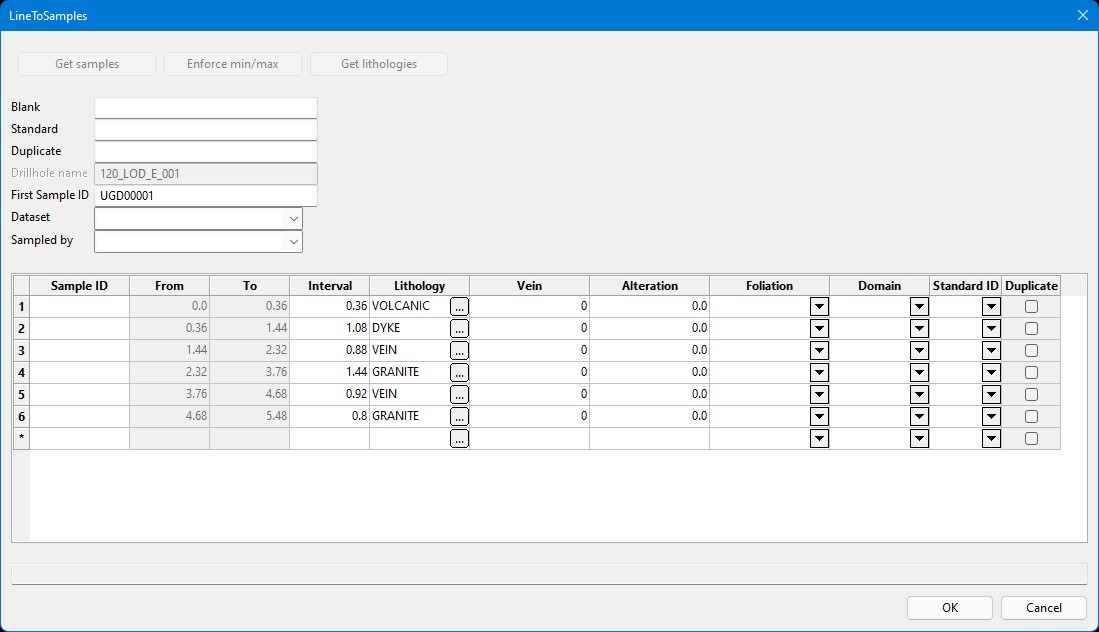
Samples Input Grid
The samples input grid may have varying columns for each setup, as any additional geology fields configured in Create Resources will be present in the samples input grid.
Sample ID (optional)
The sample ID for each sample taken for the face, as well as blank and standard samples. This field is optional, and only required if sampling is undertaken. When creating a pseudo drillhole Sample ID’s are not required.
From
The from depth (down the drillhole) for each sample. This relates to the measured distance across the face from the starting point.
To
The to depth (down the drillhole) for each sample. This relates to the measured distance across the face from the starting point.
Interval
The interval length between the from and to distances.
Lithology
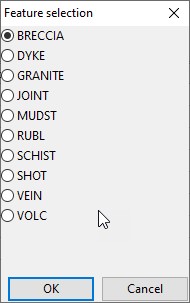
The lithology value to assign to each sample. These cells will be automatically populated with the lithology values from the relevant mapping polygons when using Get lithologies. Lithology values can be selected where required from the pop-up Feature selection panel, initialised by clicking on the “…” button within the cell.
Domain (optional)
An optional domain field can be selected from the drop-down list (populated from the domains defined in the global domain settings).
Standard ID (optional)
When standards are inserted the desired Standard ID can be selected from the drop-down list in the cell. The values in the drop-down list are populated from the ‘standards’ parameter in the LineToSamples settings. For some sites, where it is preferable to record a barcode number, the barcode number can be manually entered into this cell.
Duplicate
Will be automatically checked on to indicate which samples are duplicates.
Instructions
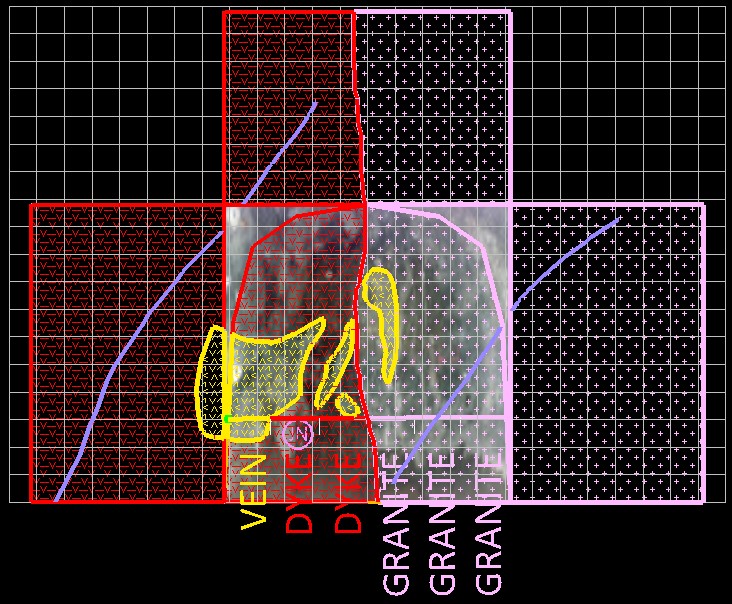
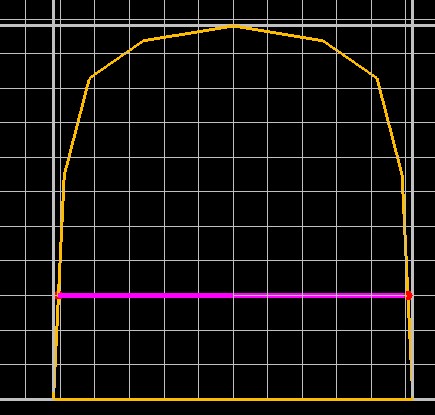
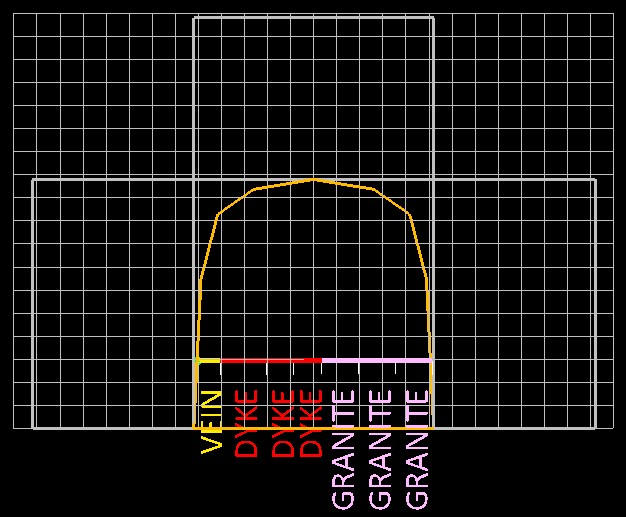
Scenario 1 – Sample across entire face and autopopulate from already mapped face
Digitise 2 points (using indicate snap mode) that sit outside the drive profile template.
Right-click to cancel out of the digitise mode once both points have been digititised.
Select ‘Get samples’ to automatically create sample intervals across the face based on intersections of the line with the mapping polygons.

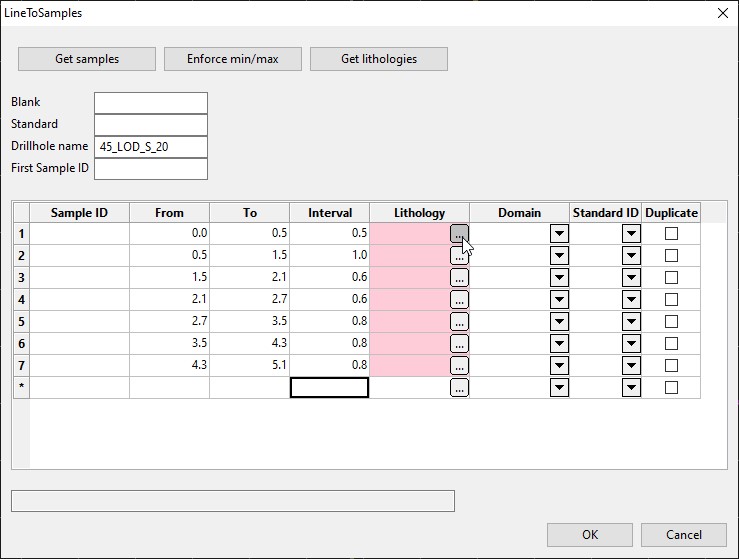
If desired, use the ‘Enforce min/max’ button to adjust and split any sample intervals that don’t align with the values set in the settings. The tool will split any samples that are larger than the maximum value defined in the settings into equal parts less than the maximum value. Intervals that are less than the minimum value defined in the settings will be extended to meet the minimum interval length.
The ‘Get lithologies’ button can be used to automatically populate the lithology cells in the grid from the mapping polygons.
Blanks and standards can be added as required by typing the number of the row after which it is desired to insert the blank or standard. After entering the row number into the ‘Blank’ or ‘Standard’ boxes the grid will auto-update once clicking out of the blank or standard box. Once the standard or blank has been inserted extra blanks or standards can be inserted by adding a new row number into the input boxes.
Duplicate samples can be selected using the checkboxes as required.
Domains can be selected, as required, from the drop-down list in the cells.
The first Sample bag number can be input into the ‘First Sample ID’ cell – this sample ID will automatically be input into row 1 of the grid, with each row automatically increasing the sample ID number by 1.
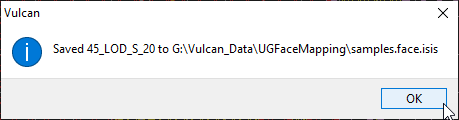
Once the grid has been populated as required, pressing the ‘OK’ button will save the sample line into the local samples.face.isis drillhole database.
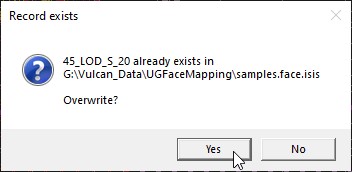
If a sample line with the same drillhole name already exists in the drillhole database the purple sample line remains on screen and a pop-up panel appears to confirm if the user wishes to replace the previous drillhole in the database.
The sample line created can then be viewed by using the ‘LoadFaceDrillhole’ tool. The sample line can then easily be removed by using the ‘RemoveFaceDrillhole’ tool.
Scenario 2 – Create multiple samples over sections of the face
Digitise each point (using indicate snap mode) that defines the boundaries of all sample intervals.
Right-click to cancel out of the digitise mode once all points have been digititised. Select ‘Get samples’ to automatically create sample intervals across the face based on the mapping polygons. The ‘Get lithologies’ button can be used to automatically populate the lithology cells in the grid from the mapping polygons.
Blanks and standards can be added as required by typing the number of the row after which it is desired to insert the blank or standard. After entering the row number into the ‘Blank’ or ‘Standard’ boxes the grid will auto-update once clicking out of the blank or standard box. Once the standard or blank has been inserted extra blanks or standards can be inserted by adding a new row number into the input boxes.
Duplicate samples can be selected using the checkboxes as required.
Domains can be selected, as required, from the drop-down list in the cells.
The first Sample bag number can be input into the ‘First Sample ID’ cell – this sample ID will automatically be input into row 1 of the grid, with each row automatically increasing the sample ID number by 1.
The process outline above can then be repeated for each desired subsequent sample line.
Scenario 3 – Create sample line before mapping face to then map over (to be done before FeatureLines is used)
Digitise 2 points (using indicate snap mode) that sit outside the drive profile template.
Enter the sample intervals as measured on the face.
The “…” button in each cell in the ‘Lithology’ column can then be used to launch the ‘Feature selection’ panel and define the desired lithology for each interval.
Blanks and standards can be added as required by typing the number of the row after which it is desired to insert the blank or standard. After entering the row number into the ‘Blank’ or ‘Standard’ boxes the grid will auto-update once clicking out of the blank or standard box. Once the standard or blank has been inserted extra blanks or standards can be inserted by adding a new row number into the input boxes.
Duplicate samples can be selected using the checkboxes as required.
Domains can be selected, as required, from the drop-down list in the cells.
The first Sample bag number can be input into the ‘First Sample ID’ cell – this sample ID will automatically be input into row 1 of the grid, with each row automatically increasing the sample ID number by 1.
Scenario 4 – A sample line has already been created for the current face
If a sample line has already been created for the current face, then running Line To Samples will provide a selection panel, as per below.
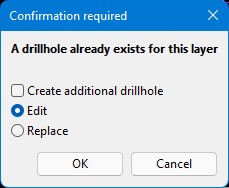
Create additional drillhole
Selecting the Create additional drillhole checkbox will allow creating a second, or subsequent drillhole for the current face.
Edit
Selecting the Edit radio button will allow editing certain values of an existing sample line in the database. The first sample ID from the database will be placed in the First Sample ID field in the panel (deleting and retyping the last character will populate all the Sample ID values in the grid once clicking out of the First Sample ID cell) and any duplicates, blanks or standards will need to be redefined.
Replace
Selecting the Replace radio button will allow a new sample line to be created to replace the existing sample line in the drillhole database for the current face.
