Selecting Layers
Once a design file has been opened, you can select existing layers or create new layers to which your design work will be assigned.
The layers of a (.dgd) are listed in the Vulcan Explorer on the left side of the interface.
Quickly open a layer by double-clicking on the layer name.
An open layer can be closed by double-clicking on the name as well.
Existing layers are selected from a list that is produced by the List  option (under the File > Layers submenu). Selection is made by highlighting the required layers and then clicking OK. The highlighting process follows the standard Windows highlighting procedure, i.e. left mouse button to highlight a single layer, Ctrl + left mouse button to highlight multiple layers, Ctrl + Shift + left mouse button to highlight a range of layers. Double-clicking on a layer acts as a shortcut, i.e. it highlights and selects.
The Pattern field can also be used to highlight layers. For example, entering D* and then selecting the Apply Pattern button will highlight all layers that start with D.
You can sort layers by name, description and date by clicking on the column heading. For example, the layers in the panel below have been displayed alphabetically.
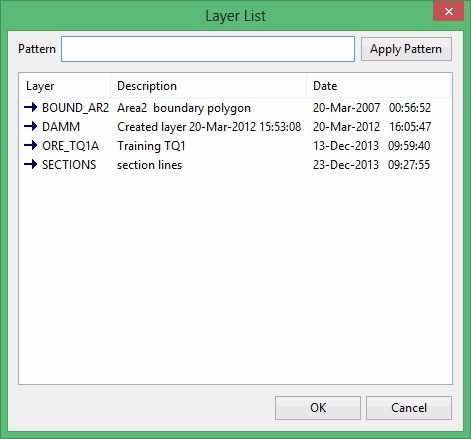
Layers indicated by an arrow are already loaded. The Description column shows the layer description as entered by the user. If no description has been entered, the default is used which is the date and time of creation. The Date and Time columns show the date and time of the last modification to the layer. The column widths can be adjusted by dragging the vertical bar between the headings.
It is also possible to select layers by expanding (in the Vulcan Explorer) the design database, and then right-clicking on the appropriate layer and choosing Select from the context menu.
New layers can be created through using the Layer option (under the Design > Create submenu), or by selecting the New Layer button  from the Design toolbar. Once a layer is opened, data can be entered (see Entering Design Data for details).
