Mining Blocks Generation Create Blocks
The functionality is separated in two phases – setup and block creation.
The block creation phase builds on the specification created during setup, adding user requirements into the same specification file.
On the Open Pit menu, point to Mining Blocks Generation, then click Create Blocks.
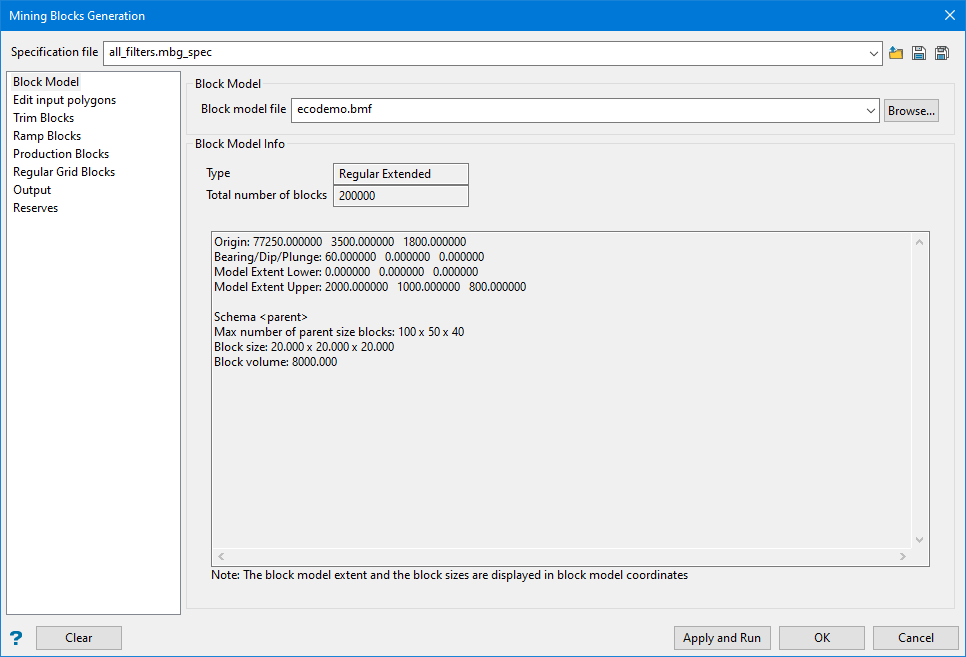
Block model
Block model file
Enter the name of the block model file, which will be used to read block model variables like density, and to calculate reserves.
Block Model Info
This displays important information about the block model that may be needed when filling in the parameters for the panels to follow.
Type
This displays the type of block model that has been selected.
Edit input polygons
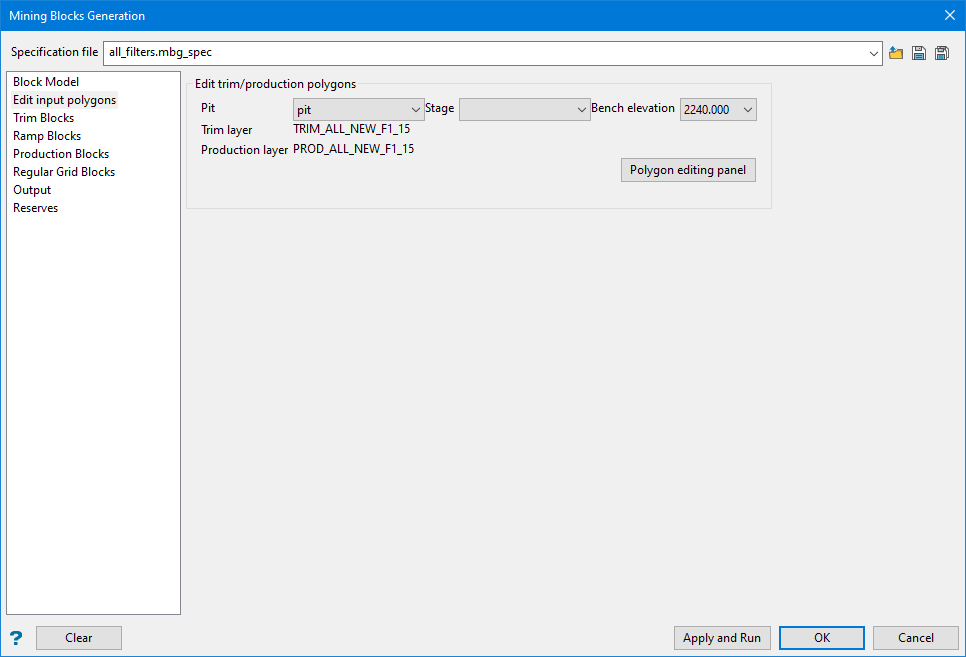
Edit trim/production polygons
Pit
Select the preferred pit name.
Stage
Select the stage.
Bench elevation
Select a bench elevation.
Polygon editing panel
Click this button to display the editing controls.

Bench elevation
The bench elevation is carried over from the first panel, however, you may change the selection here to avoid returning to the first panel each time you wish to edit a polygon on at a different elevation.
Editing options
Click this button to display the Trim options. Depending on which option you select, the panel will change configuration to provide various options:
- edit trim
- replace string
- free replace string
Using the edit trim option
Value
This controls the width between the polygons.
- Select a point on one of the strings, then select a point on the opposite string. These will be guide lines and will be stored in the design database under the name MBG_TEMP_GUIDE_LINES. Do this at two locations.
- A preview polygon will be displayed showing the results of the edit. The new polygon will be stored in the design database under the name MBG_TEMP_PREVIEW.
Using the replace string option

- Click the
 icon.
icon. - Select the string to be modified.
- Select a starting point and ending point.
Trim
Set string type for trim polygon.
Production
Set string type for production polygon.
Revert arrow 
Click this to revert all your changes.
Using the free replace string option

Use the Cancel button to Return to Edit Polygons panel.
Trim Blocks

Action
Creating trim blocks is optional, depending on pit design requirements. The trim blocks are created by dividing the trim zones, produced by the Mining Blocks Generation setup, into smaller blocks. The trim mining blocks are designed to satisfy some geometric targets like distance, area, volume, or tonnage, and also the mining direction, specified in a subpanel of this page.
Create trim block polygons / Create trim blocks
First, trim polygons with parameters matching the required target are created for each bench trim zone. Then the trim blocks are cut out from the benches using the polygons. The polygons are saved in the design database, and the blocks are saved as triangulations, under the file hierarchy specified during setup.
Trim Blocks and Polygons
The Load from Setup button imports all pit, stage, and bench data from the setup and populates all subpanels.
The  button in the Benches column opens the following subpanel:
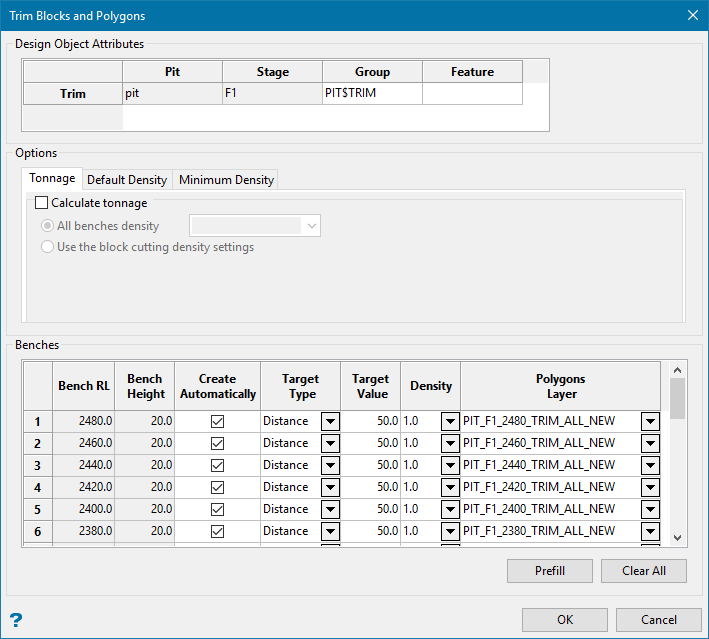
Design Object Attributes
This table displays the attributes assigned to the layers.
Options
Tonnage

Calculate tonnage
Use this option to calculate tonnage of the mining blocks solids using a block model variable or constant density values.
-
All benches density - This uses the density from the block model.
-
Use the block cutting density settings - This allows you to use the density setting for each individual bench.
Default Density
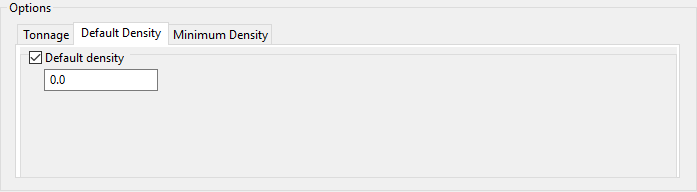
Default density
Use this option to replace the density block model variable with default values. Enter a default density value instead of calculating the value.
Minimum Density
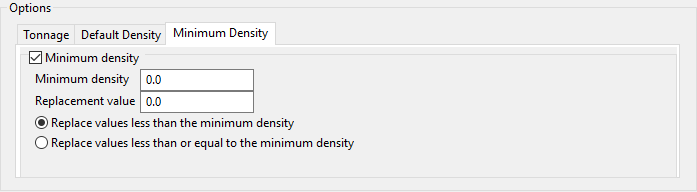
Minimum density
Use this option to replace the block model variable with density values less than or equal to the specified value.
Benches (Table)
You can delete rows from the Benches table on the Trim Blocks and Polygons subpanel, but to maintain data integrity, rows should not be added individually. It is recommended to use the Load from Setup Button to obtain the complete list of bench RLs.
Bench RL
The greyed out Bench RL and Bench Height columns are read-only and display the bench parameters, defined in the Benches tab in Set Up.
Create Automatically
The Mining Blocks Generation can create trim polygons automatically, use existing polygons that you have already created, or not create them at all. When the checkbox in the Create Automatically column is selected, the Mining Blocks Generation will create the polygons automatically matching the specified Cutting Direction, Target Type and Target Value. If the target type is tonnage, then a Density value must entered.
Unselect the Create Automatically checkbox at the bench row to disable the automatic trim polygons creation and to declare using existing polygons.
Target Type
Select a type from Area, Distance, Tonnage, or Volume.
Polygons Layer
This column specifies a layer name for each bench where the trim polygons are saved. Select a layer name to read existing polygons from.
Prefill button
The whole table can be quickly populated by clicking the Prefill button.
The Prefill Trim Blocks Parameters subpanel is displayed. Enter the Target Type, Target Value and Density.

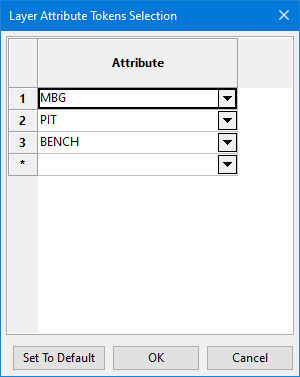
The Trim Blocks Polygons Layer Name is defined by the user. The Select button displays the Layer Attribute Tokens pane.
A layer name will be constructed automatically for each bench listed in the Benches table.
The trim parameters will also be set in each row of the Benches table.
Options
Expand polygons at the block boundary by
Use this option for a minor correction of the trim polygons segments close to the bench boundary, to ensure the successful cutting of the bench solid with the polygon.
Ramp Blocks
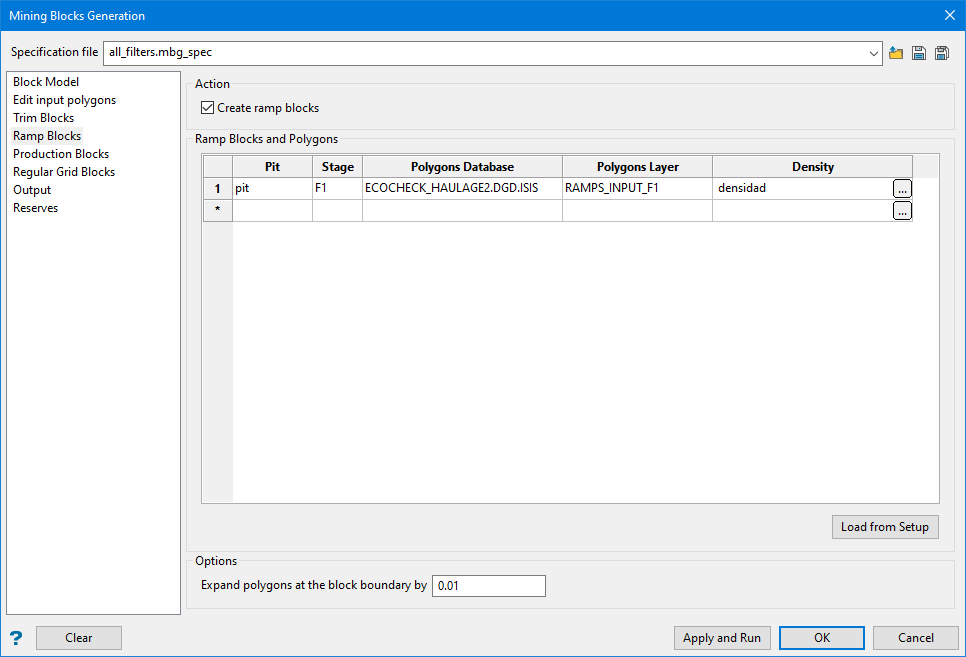
Action
Create ramp blocks
Ramp blocks can be created by cutting benches with the ramp polygons defined during setup.
The Load from Setup button will import all pit, stage and benches.
Options
Expand polygons at the block boundary by
Use this option for a minor correction of the trim polygons segments close to the bench boundary, to ensure the successful cutting of the bench solid with the polygon.
Production Blocks
Action
Use the Create production block polygons and blocks options, when required to create mining blocks satisfying specific target parameters. The production blocks are created by dividing the production zones, produced by the Mining Blocks Generation Setup, into smaller blocks. The production blocks are designed to satisfy a tonnage target, usually in conjunction with an existing block model, providing the block density values. Mining blocks are also created to match geometric targets like length, width, distance, area, and volume. The mining blocks also follow the mining direction and block advancement direction, specified in a subpanel of this page.
Create production block polygons / Create production blocks
First, production polygons with parameters matching the required target are created for each bench production zone. Then the production blocks are cut out from the benches using the polygons. The polygons are saved in the design database, and the blocks are saved as triangulations, under the file hierarchy specified during setup.
Production Blocks and Polygons
The Load from Setup button imports all pit, stage, and bench data from the setup and populates all subpanels.
The button in the Benches column opens the following subpanel:
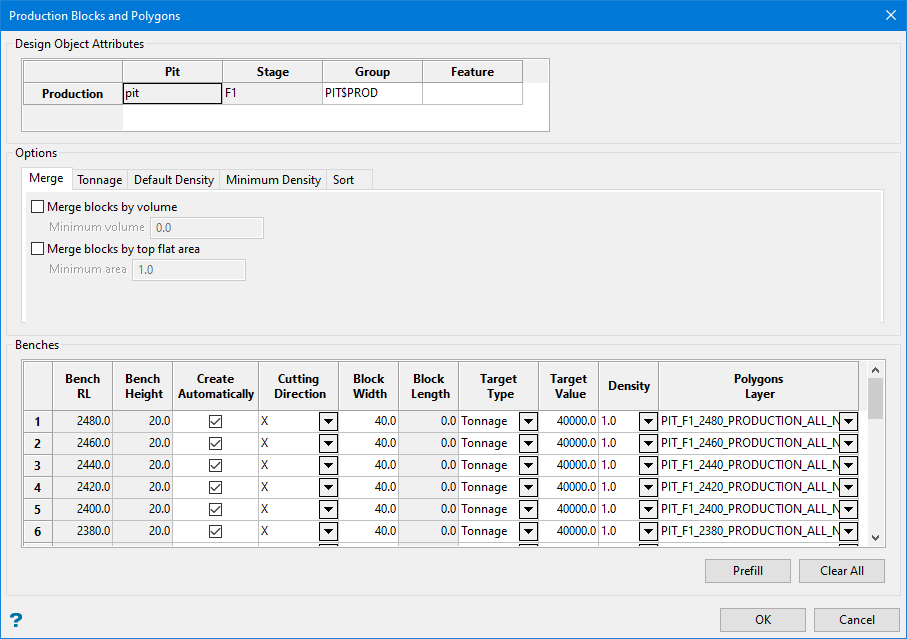
Design Object Attributes
This table displays the attributes assigned to the layers.
Options
Merge
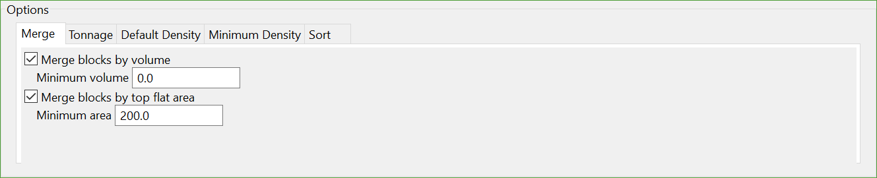
- Merge blocks by volume - Use this option to merge blocks, whose volume is less than the specified value, to the adjacent blocks.
- Merge blocks by top flat area - Use this option to merge blocks, whose top flat area is less than the specified value, to the adjacent blocks.
Tonnage
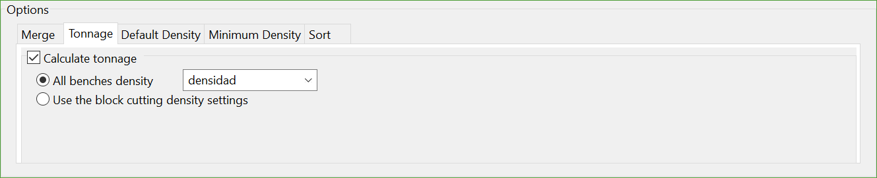
Calculate tonnage
Use this option to calculate tonnage of the mining blocks solids using a block model variable or constant density values.
-
All benches density - This uses the density from the block model.
-
Use the block cutting density settings - This allows you to use the density setting for each individual bench.
Default Density

Default density
Use this option to replace the density block model variable with default values. Enter a default density value instead of calculating the value.
Minimum Density

Minimum density
Use this option to replace the block model variable with density values less than or equal to the specified value.
Sort

- Sort polygons by block name- Use this option to ensure that the blocks are created and named in the ascending order of the block identifier, stored in the polygons.
- Sort polygons in mining and block advancement directions- Use this option to ensure that the blocks for automatically created polygons follow the xy sequence accurately.
Benches (Table)
You can delete rows from the Benches table on the Trim Blocks and Polygons subpanel, but to maintain data integrity, rows should not be added individually. It is recommended to use the Load from Setup Button to obtain the complete list of bench RLs.
Bench RL
The greyed out Bench RL and Bench Height columns are read-only and display the bench parameters, defined in the Benches tab in Set Up.
Create Automatically
The Mining Blocks Generation can create trim polygons automatically, use existing polygons that you have already created, or not create them at all. When the checkbox in the Create Automatically column is selected, the Mining Blocks Generation will create the polygons automatically matching the specified Cutting Direction, Target Type and Target Value. If the target type is tonnage, then a Density value must entered.
Unselect the Create Automatically checkbox at the bench row to disable the automatic trim polygons creation and to declare using existing polygons.
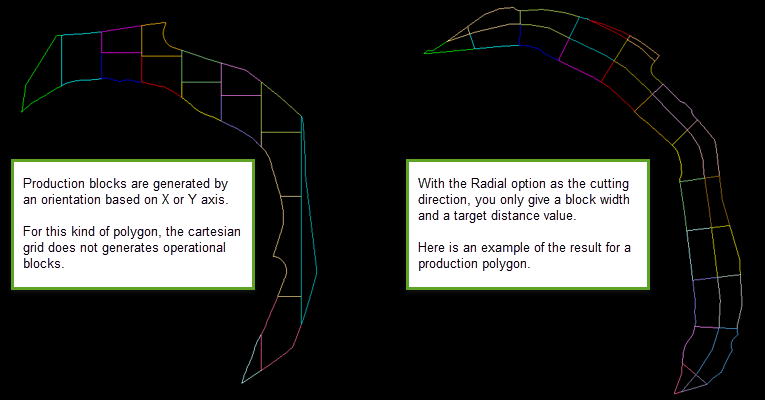
Cutting Direction
Select the direction of cut:
-
X - Production blocks are generated by an orientation based on the X axis.
-
Y - Production blocks are generated by an orientation based on the Y axis.
-
Random - Allows block dimensions to vary while leaving other factors constant.
-
Radial - Cut radially based on block width and target distance.
Block Width / Length
Enter the block width or length. Only one will be enabled depending on your selection of Cutting Direction.
Target Type
Select a type from Area, Distance, Tonnage, or Volume.
Polygons Layer
This column specifies a layer name for each bench where the trim polygons are saved. Select a layer name to read existing polygons from.
Prefill button
The whole table can be quickly populated by clicking the Prefill button.
The Prefill Production Blocks Parameters subpanel is displayed.
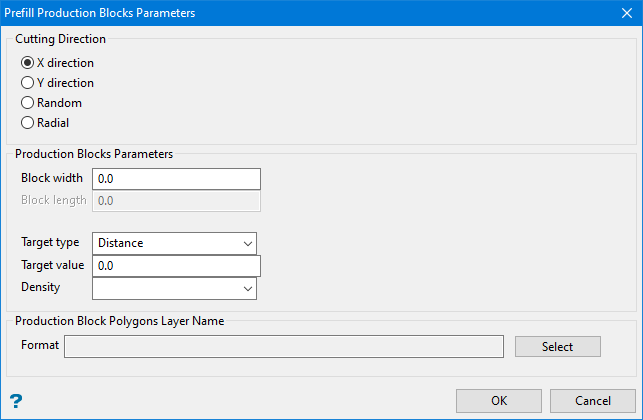
Select the cutting direction, the block parameters, target type, target value, and density.
Production Blocks Polygons Layer Name
Click the Select button to display the Layer Attribute Tokens Selection panel.
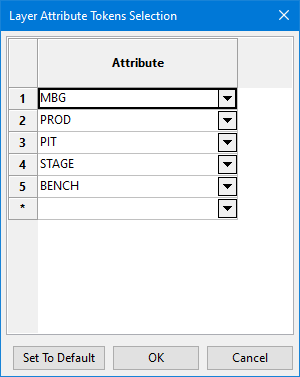
A layer name will be constructed automatically for each bench listed in the Benches table using the attributes selected from the drop-down lists.
Options
Expand polygons at the block boundary by
Use this option for a minor correction of the trim polygons segments close to the bench boundary, to ensure the successful cutting of the bench solid with the polygon.
Regular Grid Blocks
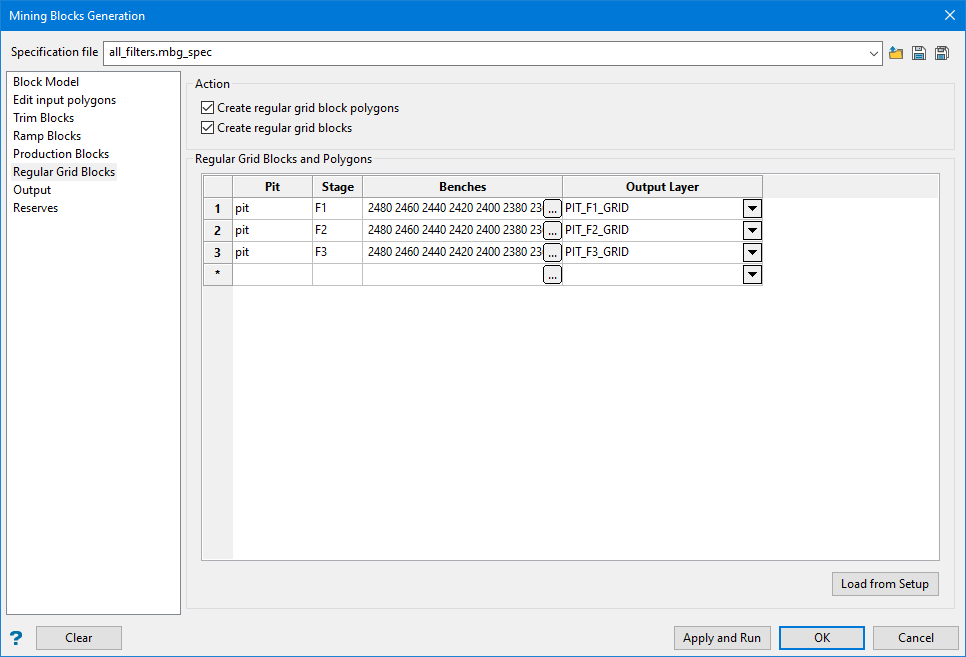
Action
Creating regular grid blocks is optional, depending on pit design requirements. The regular grid blocks are created by dividing the production zones, produced by the Mining Blocks Generation setup, into smaller blocks. The regular grid mining blocks are designed to satisfy some geometric targets like distance, area, volume, or tonnage, and also the mining direction, specified in a subpanel of this page.
Create regular grid block polygons / Create regular grid blocks
The regular grid blocks are cut out from the benches using vertical planes, positioned at the target mining blocks dimensions. The regular grid polygons can optionally be created as well. The blocks and the polygons are created inside each bench production zone polygon, generated by the MBG Setup. In the absence of production zone polygons, and on user request, the mining blocks and polygons may be created using the full bench outline in place of the production zone. The polygons are saved in the design database, and the blocks are saved as triangulations, under the file hierarchy specified during setup.
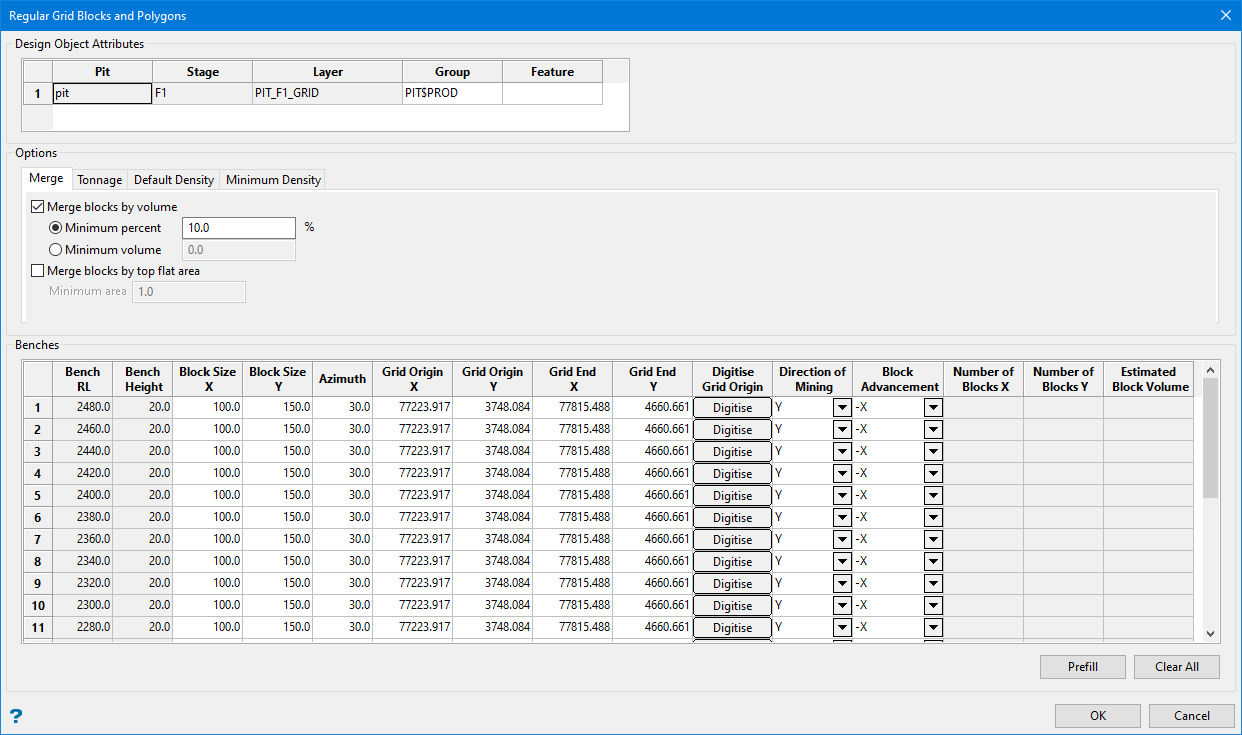
Design Object Attributes
This table displays the attributes assigned to the layers.
Options
Merge

- Merge blocks by volume - Use this option to merge blocks, whose volume is less than the specified value, to the adjacent blocks.
- Merge blocks by top flat area - Use this option to merge blocks, whose top flat area is less than the specified value, to the adjacent blocks.
Tonnage

Calculate tonnage
Use this option to calculate tonnage of the mining blocks solids using a constant density values.
Default Density
Default density
Use this option to replace the density block model variable with default values. Enter a default density value instead of calculating the value.
Minimum Density
Minimum density
Use this option to replace the block model variable with density values less than or equal to the specified value.
Benches (table)
Block Size X / Block Size Y
The values entered at the Block Size X and Block Size Y columns will define the grid cell dimensions.
Grid Origin
The grid origin and grid extent coordinates may be manually entered, or interactively selected with the Digitise button.
Tip: The Digitise button collapses the panel. Then you will be prompted to pick a point on the screen for the grid origin at the lower left corner of the grid extent, followed by a point at the upper right corner of the grid extent. A confirmation popup will be displayed asking if you accept or want to retry digitising the origin. On Accept, the subpanel is redisplayed, all coordinates are filled in the grid extent columns automatically, and the last three read-only columns Number of Blocks X, Number of Blocks Y and Estimated Block Volume are updated, providing feedback for approximate outcomes at the specified grid parameters.
Direction of Mining
This defines the direction in which the bench will be cut.
Block Advancement
This is the direction of the block sequence.
A grid can be defined for each bench, but the whole Benches table can be also prefilled using the Prefill button.
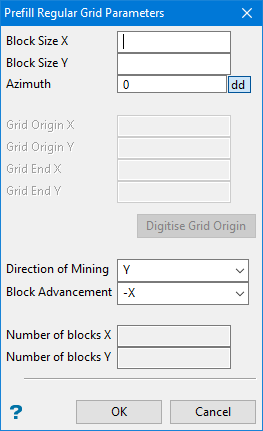
The Digitise Grid Origin button provides the same digitise function as the Digitise buttons from the Benches table.
Output
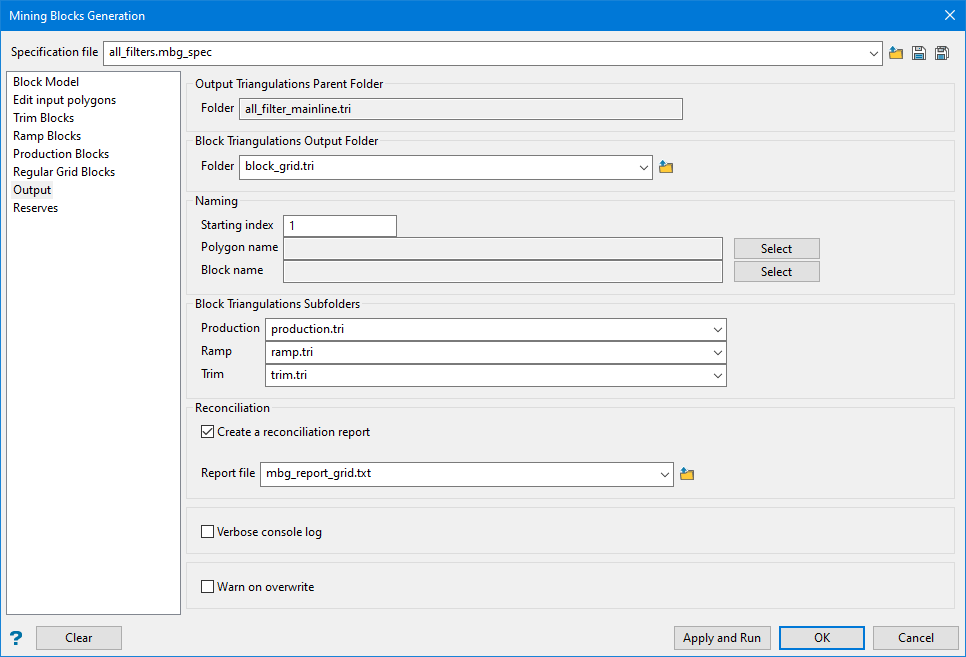
Block Triangulations Output Folder / Subfolders
The mining blocks triangulations folder needs to be defined at the Output pane tab.
This folder is created in the folders hierarchy, described here.
To be recognised as triangulation folders by Vulcan, the folder name should have a .tri extension.
Naming
The trim polygons and blocks naming is flexible, including an optional staring index, the name of the pit, stage, bench, the block type, block identifier, and any prefix, suffix or text that the user enters at the Attributes Tokens subpanel, which opens on clicking the Select button.
Starting index
Enter the starting index number. Numbers will increment by one for each polygon or block created.
Polygon name
Select the attribute that will become part of the polygon name.
Block name
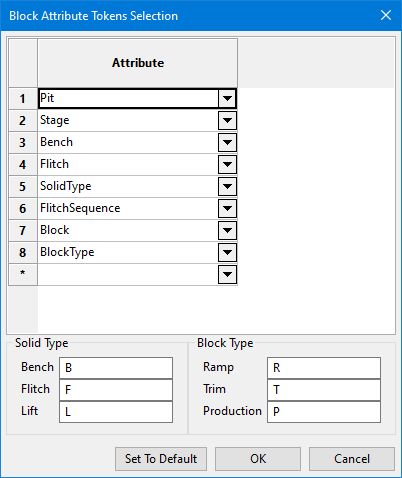
Select the attribute that will become part of the block name.
Reconciliation
A report is automatically generated to the Vulcan Console window. If you would like the same report generated as a text file, enter a name for the report and it will be saved to your working directory. You can save it to another location by clicking the Browse icon.
Verbose console log
Slightly more information is shown in a verbose report. Select this option to view the additional information in your report.
Warn on overwrite
Pops up a warning message when files and folders are attempted to be overwritten.
Reserves

Reserve blocks
After the mining blocks are generated, the reserves can also be calculated. A reserve specification file is required. The specification files will be modified automatically and the names of all block triangulation files populated. The Advanced Reserves option is invoked and the results saved into a reserves style report file.
